
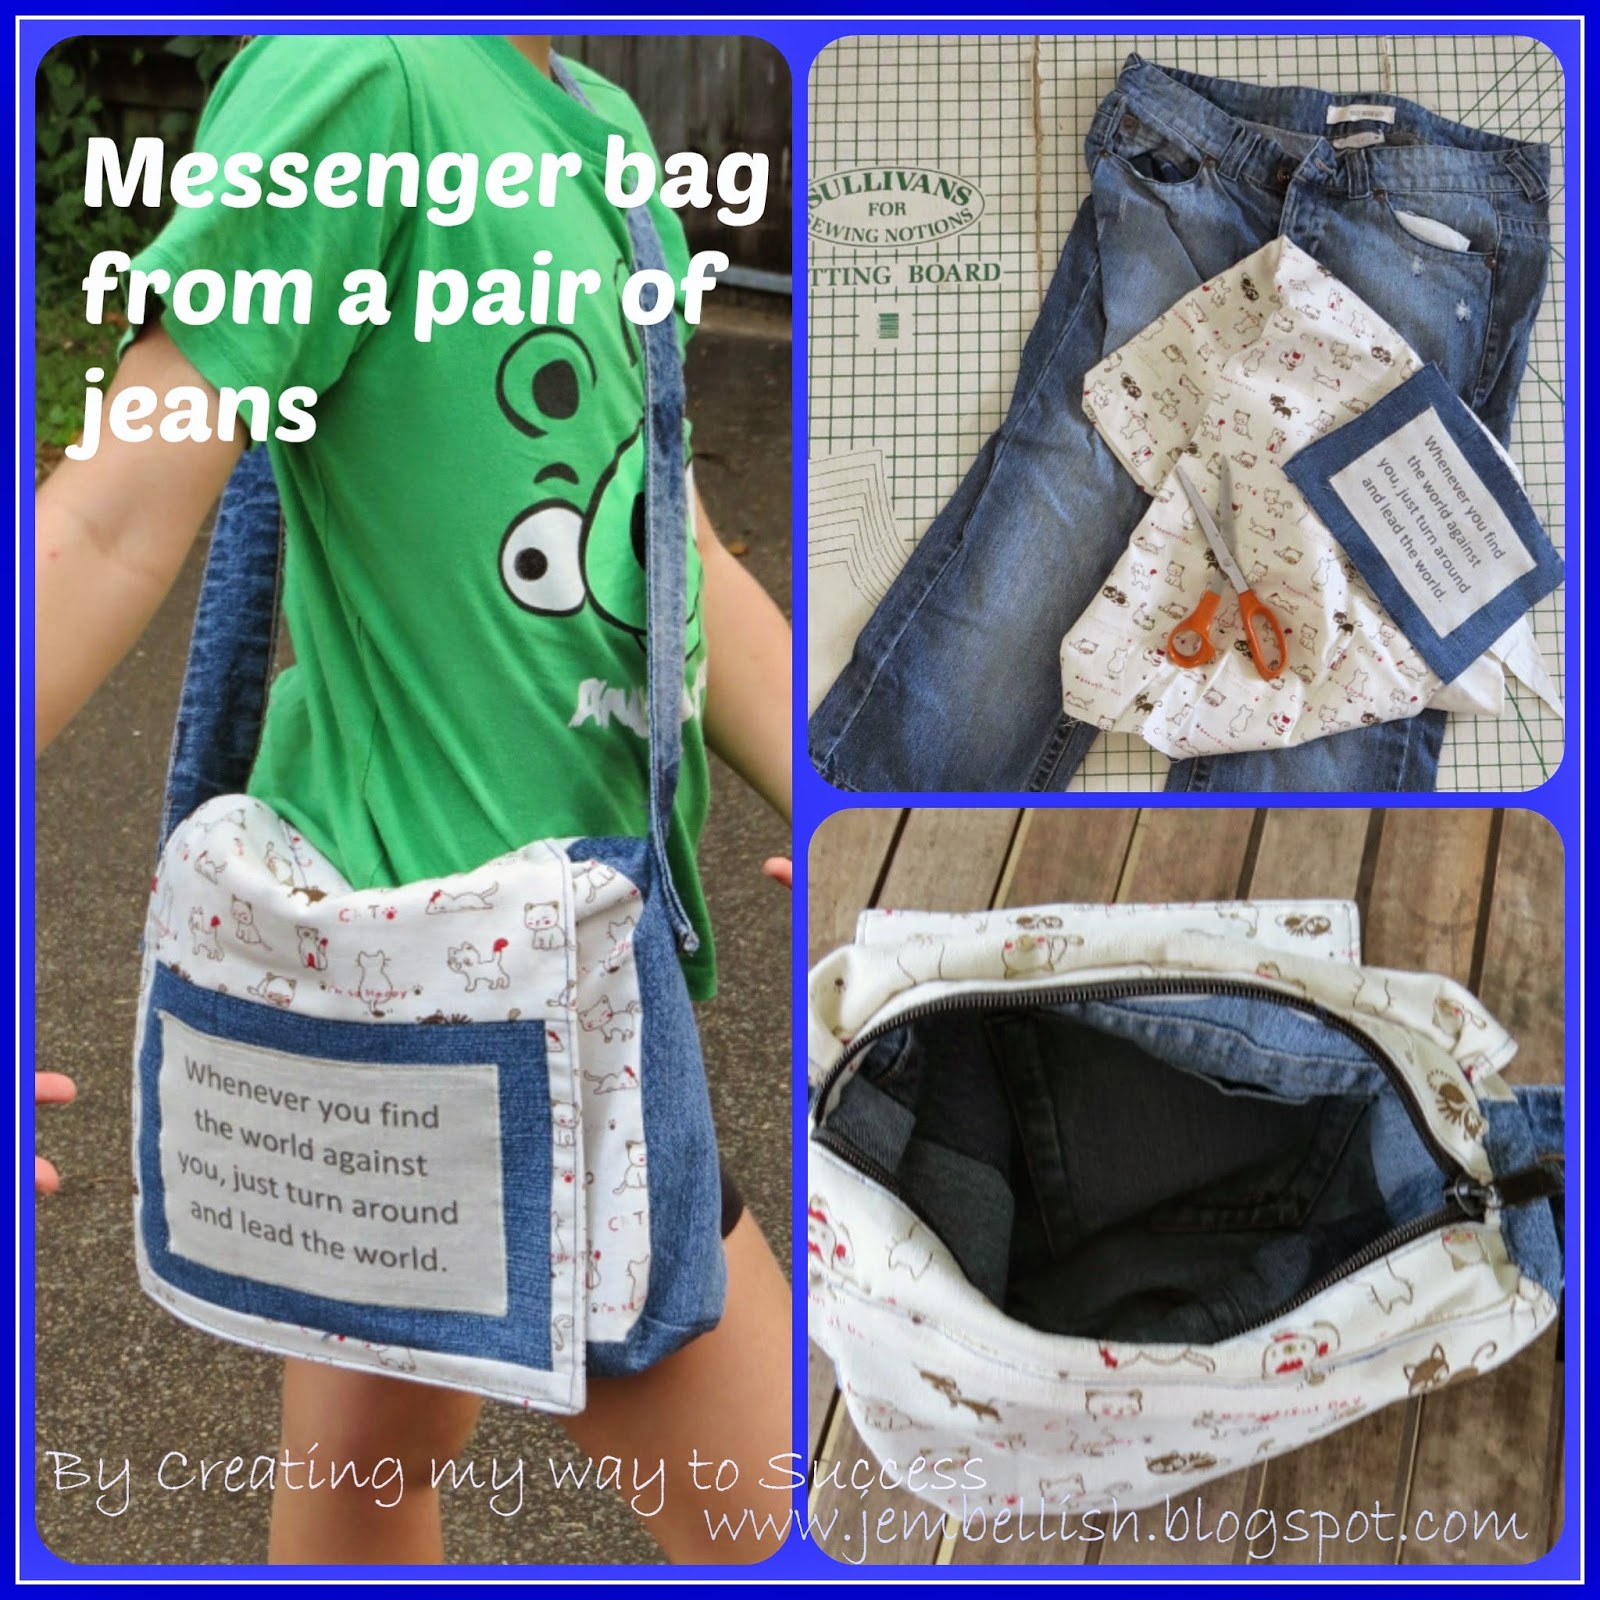
This bag has been on my to-do list for several months.
I made my eldest daughter a bag with a quote on last year, using old jeans and a pair of old pyjamas:
.jpg)
I had another quote all printed and ironed onto some denim from old jeans to make one for my other daughter!
FINALLY yesterday, I got a round to making her a bag too!
Here's how to make a messenger bag from a pair of old jeans ( and some co-ordinating fabric if you choose - although you could simply use the jeans - there is plenty of fabric there!).
I used some cute cat fabric my daughter likes!
Note - as with any tutorial made using old clothes, sizing varies depending on the size of the item of clothing you use. It's meant to be a flexible tutorial, clothes upcycling doesn't have rules - just experiment and have fun!
.jpg)
First of all the strap - the waistband is ideal for this.

Just the right width and it turned out to be the perfect length for my 9 year old daughter's bag! Cut off the waistband and unpick any belt loops or labels:
.jpg)
So now you have a ready made strap for your bag!
For the inside of the bag, Cut the back pocket 'bottom' area of the jeans - around the edges of the seams, as wide as you can make them:
.jpg)
Then neaten the edges to make them into 2 rectangles the same size.
.jpg)
Now pin them right sides together and stitch across the bottom.
.jpg)
So this is now the main inner part of your bag as seen from the side:
.jpg)
To determine the width of the sides - you want them to be a little wider than the strap, which you will stitch to the sides of the bag. As I said, nothing is fixed sizes here - so just cut strips of denim from the legs of the jeans that are perhaps 5 cm (2") wider than the strap, and about the same length shorter than your main bag parts. Cut a little longer rather than shorter, you can always trim off excess:
.jpg)
Now pin the two side strips to each side of your inner bag - right sides facing inwards:
.jpg)
Stitch into place and that's your inner bag finished!
.jpg)
You now have the inside of your bag and the strap.
.jpg)
So now to the outside of your bag. For this I used cute cat fabric, but you could always just cut further pieces from the jeans legs.
Cut 2 rectangles the same size as the sides of your inner bag.
Mine were 27 cm (10.75") square. And also strips for the sides (same size as your inner side pieces) and one for the base too - same width as the side pieces and the same length as the base of your bag.
.jpg)
Take the side pieces and your bag strap. Place the strap part way down the side pieces, where you would like the strap to sit. Mine are around 10 cm (4") down.
.jpg)
Stitch both into place securely:
.jpg)
.jpg)
Now pin then stitch these pieces together to form the outer bag. Right sides together:
.jpg)
So here you have your outer and inner bag done! Time to add the flap - which is where I added my quote.
.jpg)
Cut 2 rectangles of fabric for the flap - the same width as your main bag, but 5 cm (2") longer.
.jpg)
Place these pieces right sides together, pin then stitch around the sides and bottom. Leave the top end open for turning out.
.jpg)
Stitch, turn right sides out, then top stitch around the same 3 sides.
Your pieces so far:
.jpg)
Next you need to add your flap to the main bag.
Place it face down right sides together in line with the back of your main bag - lining up the raw edges at the top.
.jpg)
Stitch into place.
At this stage, you can slip your inner bag inside the outer bag, then turning the raw edges over on both the inner and outer bag to enclose them, pin then top-stitch around the top of the bag to finish off.
.jpg)
Since this bag was for my younger daughter whose bags tend to get hurled around a lot, I wanted to add a zip to help keep things inside the bag a little better!
So I found a zip that was longer than I needed, and using scraps of the cat fabric shortened the zip by stitching pieces of fabric face down on both sides of the zip like this - making the zip the length I wanted - in this case 24 cm (9.5").
.jpg)
Trim the ends of the zip, fold back the fabric and trip to the width of the zip.
.jpg)
Now pin strips of fabric the width of your bag and about 3cm (1") wide) right sides facing to either side of your zip.
.jpg)
First along one edge - stitch into place using your zipper foot, then open out and top stitch along the edge of the zip to prevent the fabric catching in the zipper teeth as you zip and upzip your bag.
.jpg)
Repeat along the other edge of the zip.
.jpg)
.jpg)
Almost there..
You need to first attach the zip part to the inner bag. Simply place and pin around the top edges and sew into place.
.jpg)
Finally slip the inner bag inside your outer bag, fold the outer bag raw edges inwards and pin around the edge of the zipped top part. Top stitch. The fabric is rather thickly layered now - so sew slowly and carefully! I ended up with some puckering, but fortunately it will be hidden by the flap!
.jpg)
And there you have it - a messenger bag made from a pair of jeans! It even has a couple of handy pockets on the inside.
.jpg)
.jpg)
My daughter is very happy with her new bag!

I chose the quote especially for her since she likes to do things her own way!
.jpg)
What do you think?
Old jeans are perfect for making bags with - such sturdy fabric, and I like how the various pieces of the jeans can be used - like the waistband for a strap, and the pockets as..well..pockets!

I have another free tutorial for making a bag from jeans -
Here's one I made for my daughter' swim coach.

And for lots more of my free tutorials for sewing bags and much much more - suitable for all levels of sewing ability:
Or if it's clothes upcycling you're interested it - there's heaps more ideas and tutorials to be found here:

A fabulous bag, Jill. I like the denim with the co-ordinating fabric and great that you have a zipper and pockets inside.
ReplyDeleteThanks Pam!
DeleteHi Jill, I've featured your messenger bag today...
DeleteWhat a brilliant bag, I will be making one! A x
ReplyDeleteThanks Alison!
Deletebrilliant idea!!!
ReplyDeleteIt is fabulous! I like so much the very first bag, the pyjamas fabrics and jeans match so well.
ReplyDeleteThanks Anna!
DeleteWhat a great tutorial!!!! Thank you so much!!!
ReplyDeleteThanks Timi!
DeleteI like the mix of fabrics and the use of an inspirational quote! Great recycle~
ReplyDeleteThanks Tamara!
DeleteGreat idea. One question: if the waistband isn't the length you want for the strap (want it longer), what can I do?
ReplyDeleteHi Emily, If you need a longer strap, then you could add some denim from the leg. Cut it a little more than twice the width of the waistband, fold in half right sides together, then stitch and turn right sides out - then you can add it to one end of the waistband.
Delete
ReplyDeletethank you for the nice tutoriAL.