

My first Halloween craft this year is some drinks coasters!

They have Halloween silhouettes on one side and Halloween jokes on the other:

Here's how to make some of your own!
First you need some orange fabric, cut into
12 squares of 12cm x 12cm (4.75 x 4.75")
Black fabric, approx 34cm x 12cm (13.5 x 4.75") with Vliesoflix or other fusible webbing ironed onto the wrong side.
A4 piece of white fabric also with Vliesoflix ironed onto the wrong side.

Either type up your own jokes on your computer - or download the ones I used here, and print onto the fabric side of the white A4 piece (you can just put this through your printer as you would paper)

Then cut around each joke - the sheet available for download is sized so the jokes will each fit easily onto a coaster.

Now peel the backing paper off each joke - and iron each joke onto a separate orange square of fabric, using a damp cloth
(or see your own fusible webbing manufacturers instructions.)

Then iron over the jokes without the damp cloth. This will heat set the ink in the jokes.

Now stitch around the 4 edges of each joke using white thread and the applique stitch setting on your machine - or alternatively a tight zig-zag stitch.

Now to create the silhouettes.
I just drew the shapes freehand onto the paper backing of the Vliesoflix (fusible webbing) which I ironed onto the black fabric.


I've included a downloadable version if you'd like to use my drawings! Click here to get it.
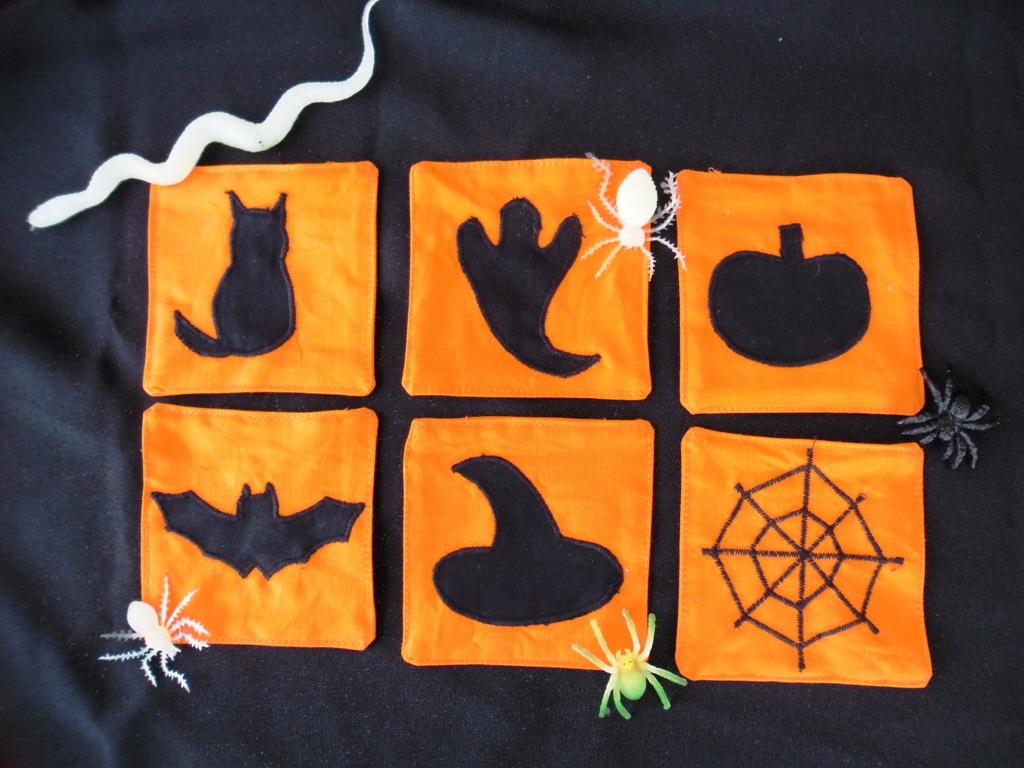
Cut each silhouette out:

Then peel off the backing and iron onto the remaining orange squares as you did with the jokes. Then stitch around the edges this time using black thread.

You may have noticed that there are only 5 silhouettes - and one orange square of fabric remaining!
For the 6th silhouette I stitched a spiders web, using the applique stitch setting on my machine:
You could draw the web onto the fabric with a pencil lightly before stitching if you like.

So now you have all 12 pieces of the coasters ready to put together.

Take one joke piece and one silhouette piece and place them right sides together making sure they're both the same way up! and pin around, leaving a gap in one side:

Then stitch around all 4 edges with a 3/8" seam - remembering to leave a gap open on one side.

Trim all 4 corners..

Then turn right sides out and press.

Then finally topstitch around all 4 edges.

Repeat for the other 5 coasters, and you should then have this:

Perfect for Halloween drinks!


For the downloadable PDF version of this tutorial, click here.
If you liked this tutorial, then there are over 100 more free sewing tutorials for you to browse through on


Nice tutorial that I think a beginner sewer could accomplish.
ReplyDeleteI also have a nice list of parties on my blog. Still looking for more to add!
Love these! Especially the bat and the witch hat :)
ReplyDeleteHow fun is this, Jill??!! So super cute. Halloween is sure a fun oone to prep for. I hope I can use this one sometime soon. Thanks!
ReplyDeleteThese are so cute Jill! Love them :)
ReplyDeleteThat's so clever Jill. I love these coasters and the colours really stand out. Your girls will love these.
ReplyDeleteI'm enjoy having a little time to myself now the girls are home, I miss not having the extra time though the pick up and drop off take up a bit of time. I hope you're enjoying your day today.
SO CUTE! I'm sure your guest will really enjoy those. They will be a good "ice-breaker/converstation starter" at a party. Thanks so much for sharing how you made them. I saw your post over at "Between Naps on the Porch".
ReplyDeleteAdorably fun Halloween project!
ReplyDeleteThese are really cute! These would be a cute gift, too - love it! I would love for you to link up to my first ever linky party for all things Halloween - going on until midnight this Wednesday!
ReplyDelete{Not So} Tough Tuesdays - www.onetoughmom.blogspot.com
Wow, time to do Halloween. Tutorial is clear and easy. Will give a go to have the festive feel.
ReplyDeleteAll so pretty! I love the spider-webby one. Also, I love your purple iron - very glam.
ReplyDeleteVery cool idea! I may need to add this to my list of projects once I get my sewing machine fixed.
ReplyDeletehola, pase de visita por tu blog y esta precioso, muy buen trabajo el de los posa vasos.
ReplyDeletebesos desde Uruguay Paty.
This a very cute tutorial! thanks for sharing :)
ReplyDeleteThank you for sharing at the Thursday Favorite Things blog hop
ReplyDeleteAwesome set of instructions. Such vibrance and colour.
ReplyDeleteLove these Jill, you are so creative :) Thanks for sharing at Creative Mondays, you are one of this weeks featured blogs :)
ReplyDeleteThanks Jessica!
ReplyDeleteThanks Claire!
ReplyDelete