Showing posts with label clothes upcycling challenge. Show all posts

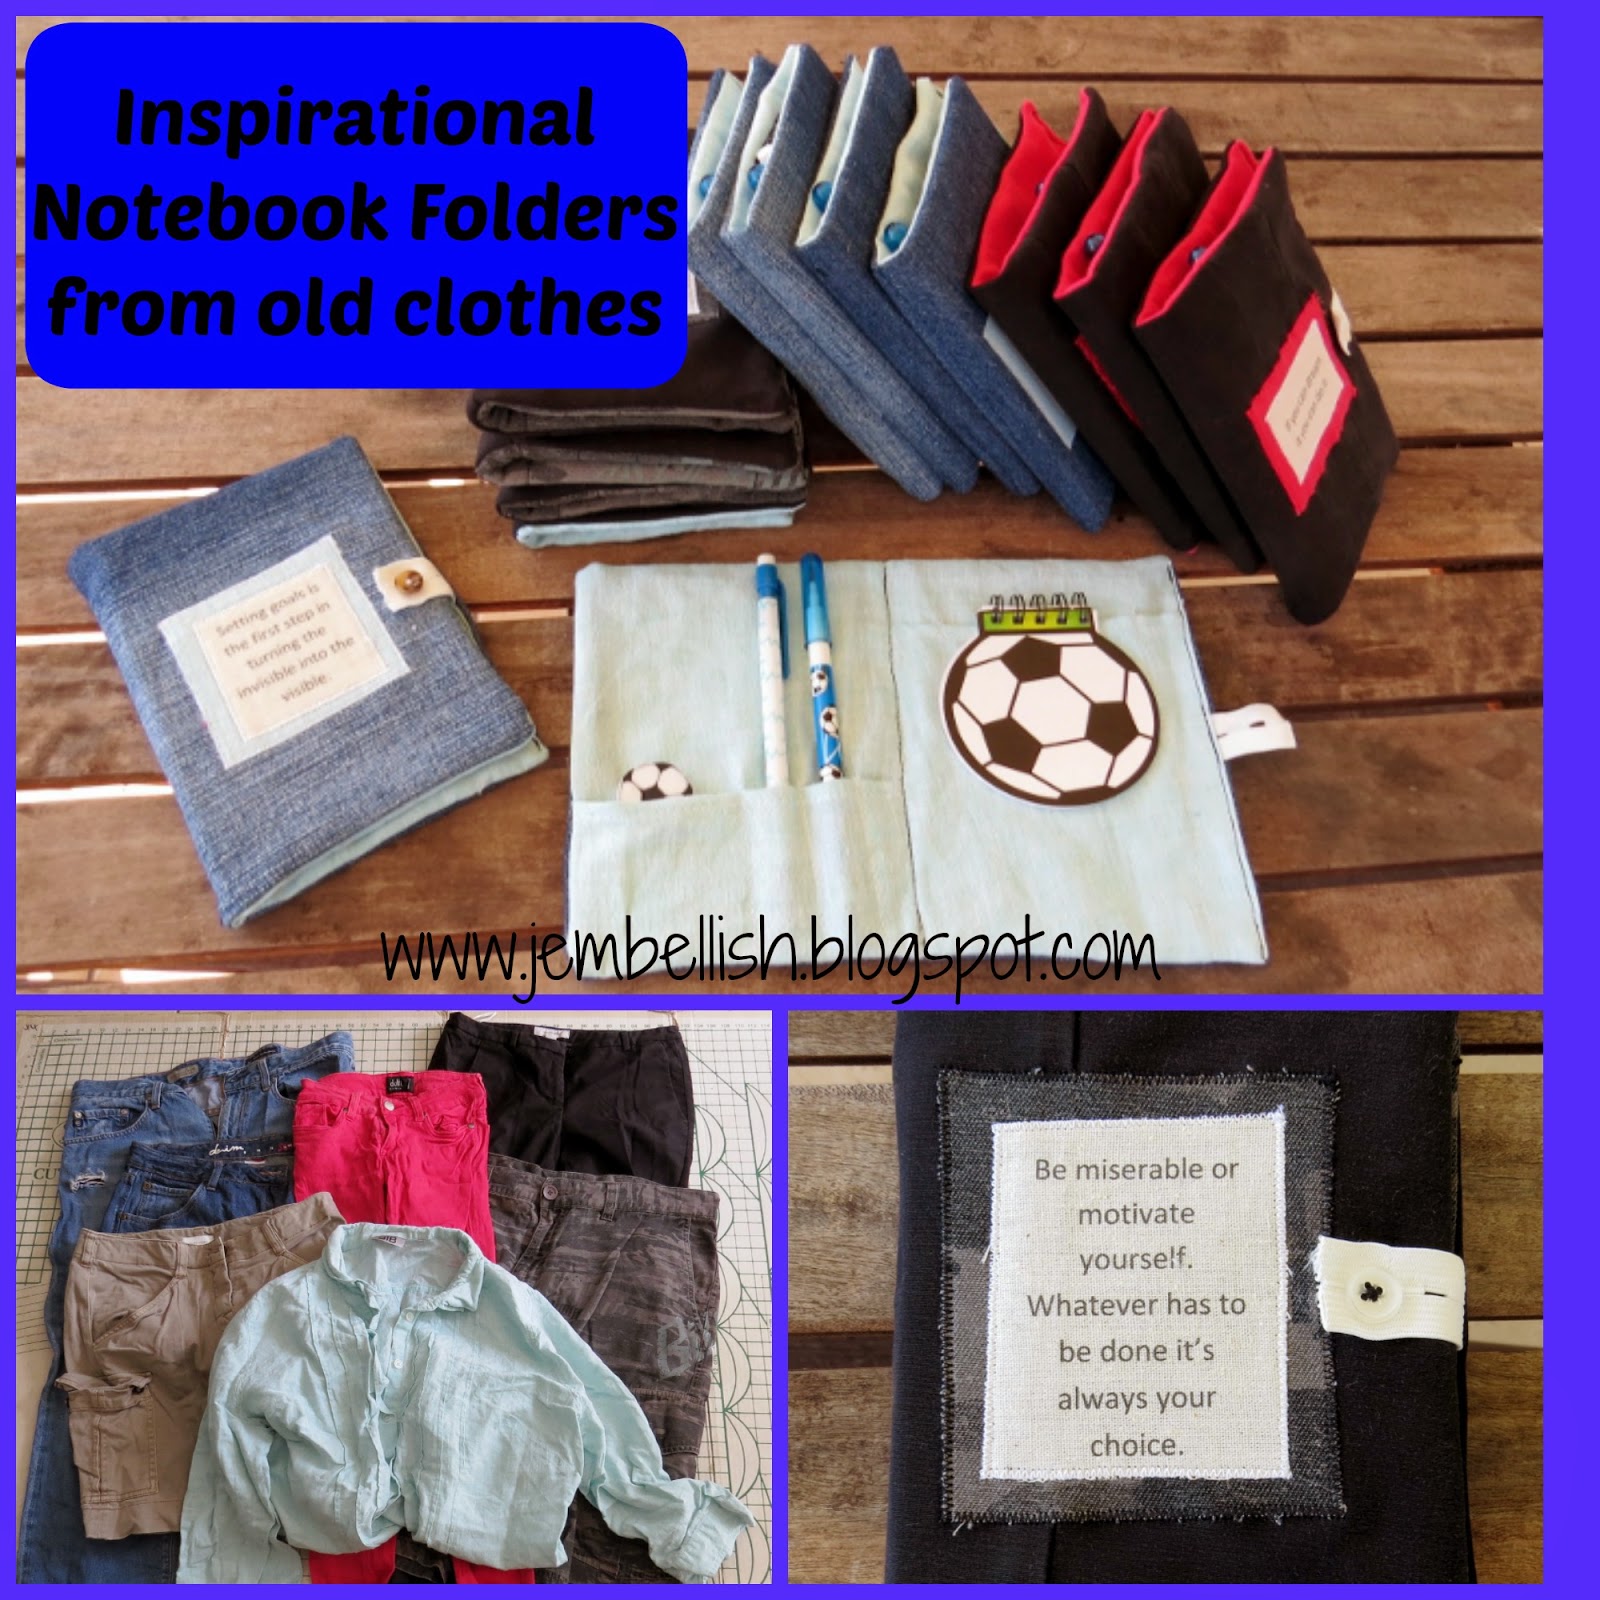
Inspirational Notebook Folders upcycled from old clothes


Here's my latest clothes upcycle for this year's challenge to upcycle old clothes into things to sell for my daughters' school carnival.

For this, I decided to try and use up this pile of notebooks and pencils etc that I bought for a few cents last year and they've sat in my stash waiting for months to be used for something useful!


I decided to make a similar folder to one I've made before:
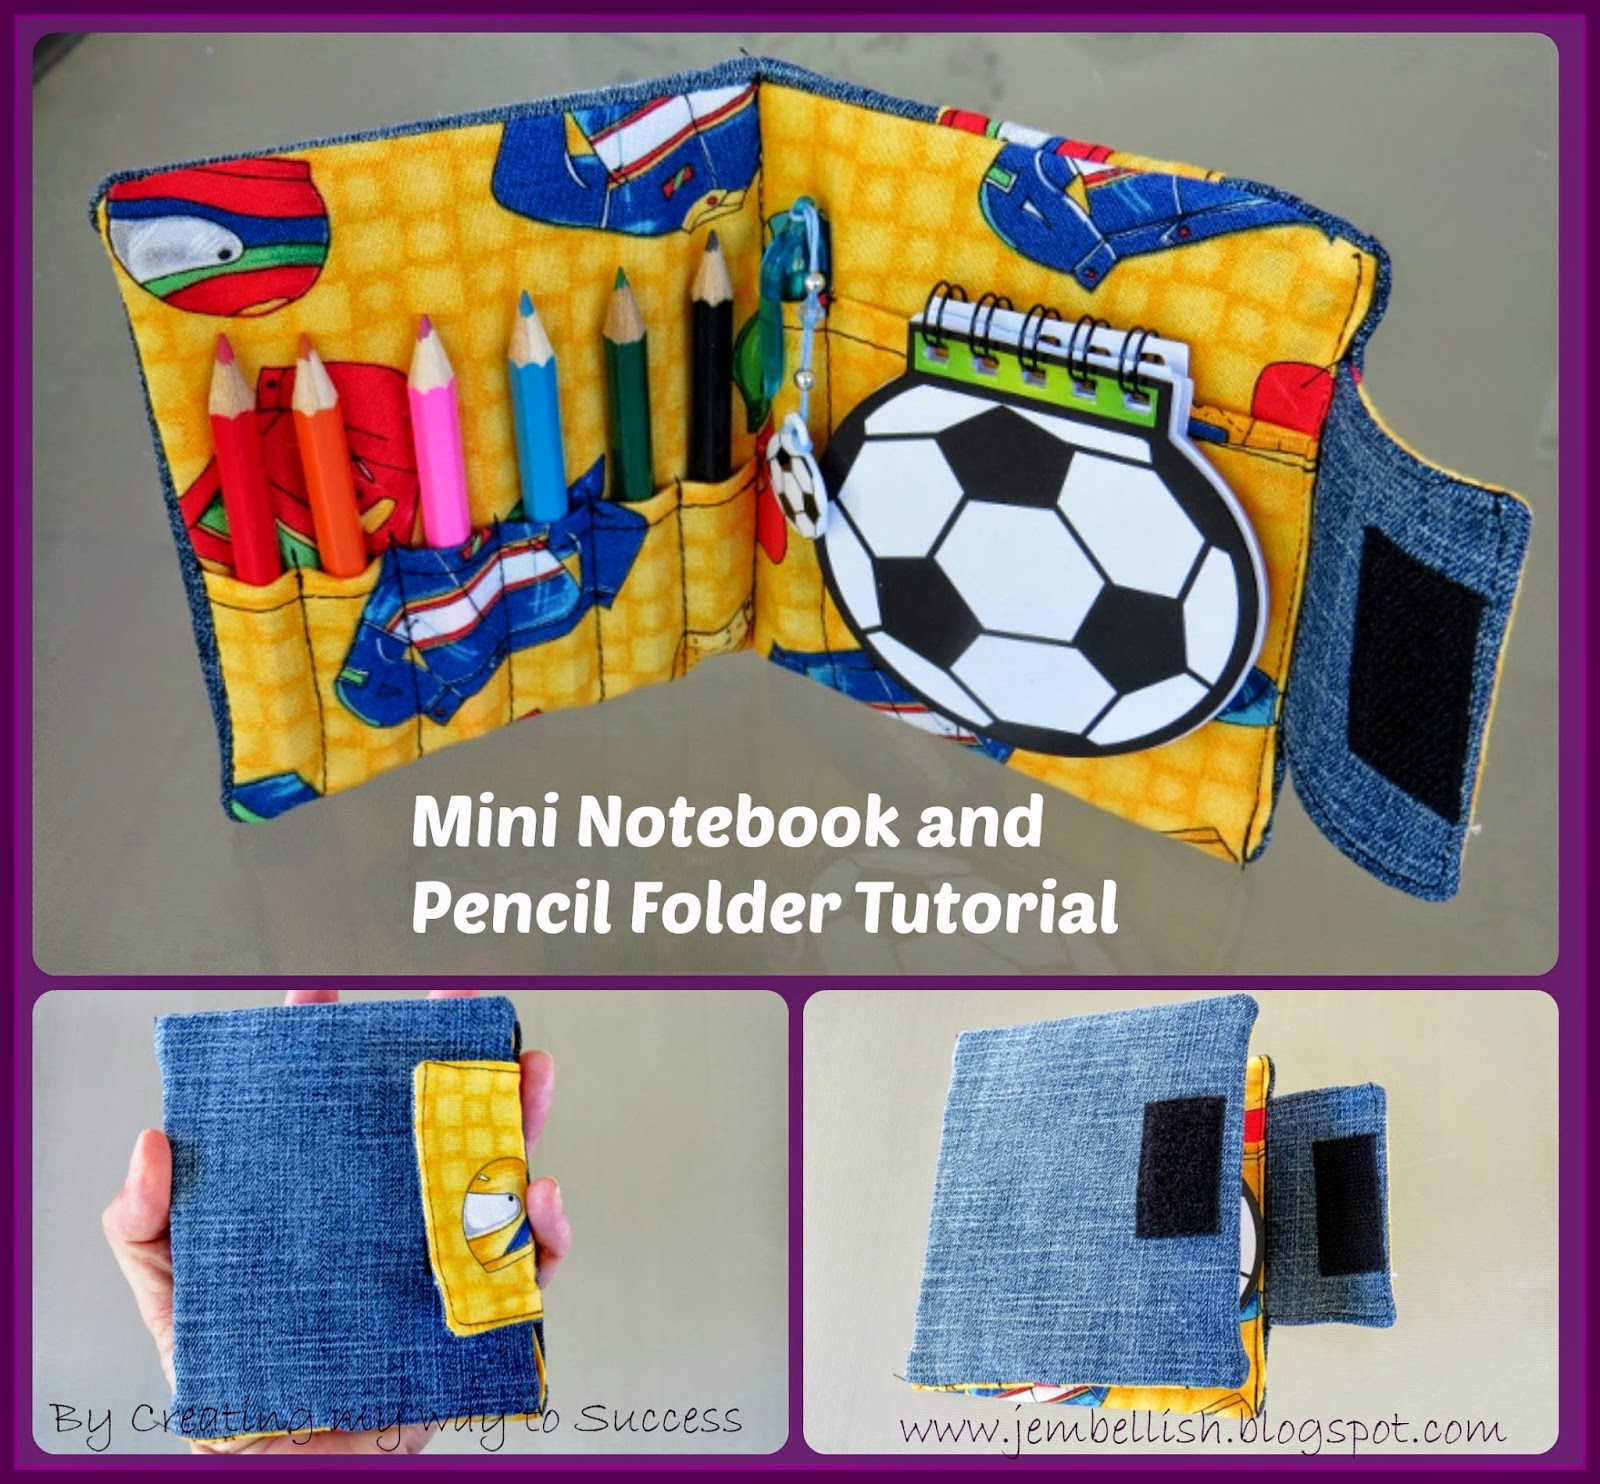
This time I changed the measurements, the pockets on the inside, the embellishment on the outside and the way the folder closes.

Here's the measurements of fabric you would need to make these inspirational folders:

2 pieces stiff cardboard 10 x 15cm (4 x 6”)
1 outer piece fabric (denim) 26 x 17 cm (10.25 x 6.5”)
2 pieces inner fabric (patterned) 17 x 13cm (6.5 x 5”)
1 piece inner fabric (patterned) for pencil pockets 8 x 13cm (3 x 5”)
1 piece inner fabric (patterned) for notebook pocket 15 x 13cm (6 x 5”)
1 piece inner fabric for front quote background
1 piece fusible webbing approx  8 x 8 cm (3 x 3”)

For the fastening
1 button
1 piece elastic - I used the adjustable elastic with ready cut holes reclaimed from the inside waistband of an old pair of jeans! You could also just use regular elastic and snip a hole in it to fit the button through!


For the inspirational quote:
1 piece white fabric, or I used calico - size of A4 piece of paper
1 piece fusible webbing - size of A4 piece of paper


To print the quote onto the fabric - make a template of your quote - or whatever you'd like printed on a simple Word document on your computer. I printed a lot of these quotes at once - if you'd like a copy of my template, click here to download.

Then cut a piece of fusible webbing to the size of an A4 piece of paper. Then iron this to the back of a white piece of fabric - or I used calico. Carefully cut the fabric to the size of the paper and then you have your sheet of fabric ready to print.
Simply put this sheet of A4 fabric into your printer as you would a sheet of paper (making sure the fabric side is up) and hit print!

Once the quotes are printed on the fabric, you can cut each one out, peel off the backing and iron onto the front piece of your folder! I've found through trial and error that black ink works great and survives washing, but coloured ink washes out.  If you iron the printed words once you've finished attaching them, I've read the heat sets the ink into place. I don't know if this is true, but I always do it just in case and my black ink has never washed out!

So for the front of the folder - I ironed a piece of fusible webbing to the back of a scrap of fabric from the inner of the notebook folder. I checked it was slightly bigger than the size of the quote I was going to use. Then I ironed the background and the quote onto the front right half of the denim outer piece of fabric, and applique stitched around both squares.

Then I followed my tutorial to construct the folder - missing out the decorative strip at the back and the flap with velcro for closing it.
I stitched on a button just to the right of the quote and centrally. 
 (the button was reclaimed from the shirt I cut up for the inner fabric).

For the pockets on the inside - you can adjust to fit any kind of pens, pencils, erasers and notebooks you have. Just lay them on top of the pockets and pin along where you want to stitch.

I had a pen, pencil and eraser to fit on the left. I also added one extra pencil pocket. On the right I put the notebook in and stitched down either side of it. It's also the right size for other small notebooks you can buy.

The idea is that these folders can be refilled with other pencils and notebooks over time as the others get used up.

For the fastening, I decided to make use of some elastic I'd reclaimed from an old pair of jeans from a previous project. It's the elastic you get in kids pants that you can adjust the waistband size with.

Perfect for closing these notebook folders. I simply stitched the elastic into the folder as I closed the final edge, then closed it by fastening onto the front button and trimmed the edge!


I'm really pleased with these little folders.


And I had fun choosing the quotes to put on them:


This is one of my favourites to tell my girls when they're grumpy about doing something they don't want to do!


From my clothes upcycling stash I used up a pair of blue jeans, a pair of stretchy red jeans, a pale green shirt, a pair of black trousers and a pair of camouflage shorts to make these folders. 
(the second pair of blue jeans and the beige skirt in the picture didn't get touched)

That fabric made 13 folders in all, 

and I still have some scraps left over - together with waistbands, pockets and zips that I'm sure can be used in future projects!

To see the other things I've made so far for the clothes upcycled school stall, go here.

To keep up with more of my clothes upcycling challenge this year and plenty more upcycling ideas and inspiration, I'd love if you followed me on Facebook, 

Jill


Messenger bag from cargo pants - another clothes upcycle


Continuing with my Clothes Upcycling Challenge for 2015 I made a messenger bag from a pair of cargo shorts and some other fabric from my stash (helping my stashbusing cause at the same time!)

I've wanted to try this tutorial from Noodlehead for a while so decided this was the perfect opportunity.


This is what I started with:

Since the pattern uses a pair of cargo pants not shorts, I had to alter it slightly so I had enough fabric. The strap I made entirely from the co-ordinating fabric rather than half and half, but I think it works ok. I also had to unpick a pocket and make the whole bag slightly smaller than the pattern to give me enough fabric.


The pattern itself was fairly easy to follow although perhaps a little less detailed than I'm used to. I tend to go for overkill and photo and describe even the smallest stage in my tutorials as that's how I work. Still - this is overall a straightforward bag to make and a great way to upcycle a pair of pants!


The strap was possibly a little bit long for my daughter. Generally my girls love to model things I've made for me, but not on this day! However, I did manage to cajole my youngest into a couple of shots!


Left over fabric from the shorts?  A few pockets, a zip, buttons, label and the waistband. I've added them to the bag from last week's upcycle to be used in some future project I haven't yet thought of!

I'm pretty happy with this week's upcycle.  Do come back next week to see what I make next!

For over 600 ideas for clothes upcycling, check out the ongoing linky here. Please do add your own ideas too!

If you are interested in upcycling, I also share lots of upcycling ideas, for clothes and lots of other things too, on my Facebook page.

Jill

Bag and elephant from shirt and shorts - starting my clothes upcycling challenge 2015


I've settled back in from our big holiday now and am back into sewing - in particular I've started my big clothes upcycling challenge for 2015.

I started out with this shirt and pair of shorts.

I had decided previously what I wanted to make - this Reversible bag, a free pattern and tutorial from Very Purple Person.
I wanted to use the pockets on the clothes in the bags.


So it meant being a little creative in my pattern placement and cutting.

The template is free and simple to print and stick together. The instructions are also clear and straightforward with pictures and drawings to help.  It's a nice simple bag, and I'm really pleased with how it turned out.

 Of course there was fabric left over, so I wanted to try and use it to make something else.

I've so many patterns and tutorials on my Pinterest boards, that I have decided to make use of these for this clothes upcycling challenge.
This time I chose an Elephant Softie, using this free pattern from Made by Enginerds.

Again the template is free and easy to print and use.

It's a very simple elephant to make, and the tutorial is nice and clear with good photos. I'm really pleased with this cutie - my girls have given him the definite seal of approval and want to make ones for themselves now!


The elephant and bag look cute together - maybe I can sell them as a set?


The last of the remnants of this shirt and pair of shorts I have deconstructed into parts I may be able to use - zips, buttons, labels and fabric scraps:

And the seams etc I'll keep to use for stuffing for something!


Overall, I'm very happy with the start of my Clothes Upcycling Challenge for 2015. 

 I hope you'll keep on coming back to see what I make each week from my selection of old clothes!

If you want to keep up to date with the goings on here at Creating my way to Success - and receive 3 free sewing tutorials exclusive to subscribers - then why not sign up for my monthly newsletter here.

Or check out my free tutorials right here on the blog - there are over 100 and more are being added all the time!


T-shirt upcycle. Weaving - a bowl?


A while ago, I found a tutorial for weaving a rug from strips of t-shirt yarn.  
As I was sorting through my large pile of clothes to be upcycled, I found a lot of t-shirts and thought I'd give the weaving a go!.

So here's the pile of t-shirts, and one of my daughter's hula hoops:

I cut strips from a white t-shirt to loop around the hoop for starters.


Then I cut some continuous strips from other t-shirts, by cutting around the main part of the t-shirt in a spiral. 

And off I went..

To join strips of yarn together end to end, I tried one method first, but came up with a problem when I wanted to attach the beginning of a whole ball of yard and couldn't fit the ball through the hole!
So I took to just tying it with a reef knot - nice and simple. The weaving wasn't perfect fabric and perfectly smooth (at all) so I wasn't worried about a few small knots here and there.

My youngest daughter wanted to have a go when she came home from school. And she wove as fast as I could cut and roll balls of yarn!

As we wove on, we found that we'd probably pulled the yarn a bit too tight initially and the rug we had intended to make wasn't very flat!


So we decided to stop, cut and tie the ends (again just using reef knots) and then trim the ends.


And here is what we ended up with..


It's quite a sturdy bowl, perfect for holding more t-shirt yarn balls!


Or even a fruit bowl!


We are going to try this again, and try to keep the tension a bit looser to see if we can make a rug with the remaining yarn!

Have you ever tried making things with t-shirt yarn?


I'll make sure and post photos of our next attempt at a woven t-shirt rug. Hopefully the next one will turn out flat!