Upcycling Baby or Kids Clothes


One thing I really wish is that I'd discovered blogging and all the crafty inspiration there is out there when my girls were babies.  There are so many things I wish could have made for them, like busy books and toys.

But the biggest regret I have is that I didn't keep all those cute clothes they wore that had happy memories of things they did or places we went.

The idea of making a quilt from your child's old baby clothes is so precious! I would have loved to have done that, but instead we passed our girls clothes on to friends or charity shops.

Still - I can pass on the ideas now, so that new parents and grandparents out there can save those clothes and precious memories to make something more lasting and practical with!

So here are some ideas for upcycling baby clothes:


You could use them to make dolls clothes with,
like Vixenmade did here:


Extend the life of the clothes as your child grows, like 
 Wesens-Art did here:


There is always the bag, that can seemingly be made from almost any clothing item,
Freestyle Willy made one from a pair of kids pants:


Or a bag from another:


As I mentioned at the start - what I wish I'd heard of when I still had all those cute clothes was a quilt made from baby clothes.
You could keep the clothes and make one yourself, or there are people around who offer to make them for you.
For example - one I found is Jelly Bean Quilts
Do head on over there and take a look at some of the gorgeous quilts she has made for people from their baby's clothes!


For more baby and kids clothes upcycling ideas you can check out my Pinterest Board here

Other individual clothing items upcycling posts can be found here.


Happy Upcycling


Pins and PIncushions


How important are pins to you when you're sewing?

For me until recently, I just bought cheap pins and assumed that 

"a pin was a pin"

But little did I know.....

I have some very small pins with tiny heads...
But these are small and tricky to get hold of to pull out, so I mainly just use these for pinning up my daughters' sporting ribbons!


Then I have lots of pins with round coloured heads - like these on this cute Christmas pudding pincushion that my daughter was given last year!


However, after posting a picture of the sad state of many of my pins on
 my facebook page recently..

I did receive lots of advice as to what pins to buy.


A few days later I went out and bought these:

WHAT A DIFFERENCE!

Whereas my old pins..

were shorter and would bend easily when I tried to push them through thick layers of fabric, these new pins are longer and stronger and as yet, I haven't managed to bend even one of them! (I've had them about a month now!)

So since I bought some new pins, I decided that I needed a new pincushion to put them in!
Cute, isn't it?

So what kind of pins do you use?


Then of course there is the other question of how you use your pins? Do you put them in the fabric in line with where you're going to stitch, or at right angles to the line of stitching?
Personally I've always put them in line with the stitching:
(see my dodgy bent pins?)
That's the way I learnt and it never occurred to me to do it any other way! Recently however, I've been trying to experiment with pinning at right angles to my stitching to see if it's easier ...
I'm still deciding. It's hard to break a habit!

I even found a whole article written about 
"How to use Pins the Right Way"

Who would have thought that 

"a pin could be so much more than just a pin!"


Insulated Picnic Bag


Yesterday I made this bag to use for picnics and days out.

I used my tutorial for the Zipped Cylinder Toiletry Bag,

 and resized it to make a larger version!


For the outer fabric, I used some sturdy 
Cotton Canvas Fabric.

For the inside, I used some pieces of old inflatable pool toys - as this was waterproof and could be wiped easily if any food or drinks spill inside!
I also added a layer of insulation between the outer and inner fabric using an old car windscreen shade, and some other thin foam packaging pieces I had in my stash. 
This layer of insulation should help keep our drinks and food cool!  I've used old car windscreen shades for this before with my insulated lunch bags which our girls have been using for a few years now!

The car windscreen fabric - or packaging foam also provides stability and shape for the bag.

I tried my bag out filling it up with drinks in the main section..

And bags of chips in the drawstring section in the top of the bag - a great part for keeping lighter packs of chips or crackers separate from the bottles of drinks.


If you're interested in the measurements for this bag, I used:

Circular ends (2 of inner and outer fabric) - 26cm (10.25") diameter

Bottom bag part 

(1 Outer fabric, 1 Inner Fabric, 1 Insulation Fabric) 

- 82 x 30 cm (32.25 x 11.75")

Top bag part (1 Outer fabric, 1 Inner Fabric, 1 Insulation Fabric)

- 82 x 12 cm (32.25 x 4.75")

Drawstring section - 82 x 20 cm (32.25 x 8")

Zip measured to 70 cm  (27.5")

Strap - 100 x 10 cm (39.5 x 4")

I attached the strap to either side of the bottom bag part just before 

attaching that part to the zip. I just eye-balled where to put the 

strap.

Then I just followed my tutorial to make the bag, stitching the 

insulation layer to the outer bag part.


I'm really happy with how the bag turned out.

I even found a zip in my stash that was nice and strong and had 

two zip pulls on it!


And of course my daughters have already tried to claim it for 

themselves...

But this one I'm keeping for use as a family!


What do you think?


There are over 100 more free sewing tutorials for all sewing levels and abilities on 


Upcycling trousers / pants


This week I want to take a look at different ways that you can upcycle those old trousers or pants.
I've already looked at jeans, (which are obviously a type of trousers/pants), but this post aims to look at other types of trousers/ pants. So here goes:

I had to start with this AMAZING transformation of 
a pair of pants to a jacket by Sew Lil Time:


Here's a wine bottle bag I made from a pair of kids trousers:


A bigger bag from pants by Freestyle Creating my Villy:


How to turn a pair of mens pants to boys pants by What I Live For:


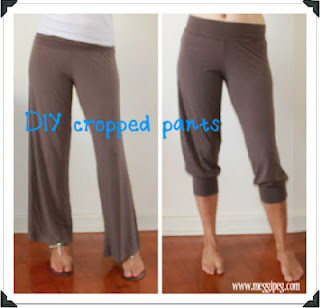
Long pants to cropped cuties from Meggipeg:


A Corduroy Pocket Bag from Pants by Threading my Way


Some great ideas there - do you have any more?

For more ideas check out my 

You can visit the other posts for individual clothing items here, or the general clothes upcycling linky which has over 600 fabulous ideas and projects here.

Happy Upcycling!


Conversation Coasters


A couple of years ago I made some conversation coasters to encourage our daughters to tell us about their school days over dinner.
I posted a tutorial here on how to make your own.

I decided this week to make some new coasters and start to use this idea again.
Here's the ones I made this time:

And if you want to know more about how we're using them,
 take a look here!


I'll be linking this post to many of the fabulous linky parties whose pretty buttons can be found on the bottom of this page, and whose direct links can be found on my linky party page.

Birthday Gift Pencil Case

My youngest daughter has another birthday party to go to this weekend (what a great social life my kids have - much busier than my own!). 
So I made pencil case for the birthday girl (that is the gift of choice for friends this year!)

Its just a basic lined pencil case - with the name appliqued to the front.

I love the blue fabric I used for the name - it's shiny and sparkly (and very messy to sew with!)

But I do love the look of it!

Now we just need to get some pens and pencils etc to fill it up with!


Do you make gifts for birthdays? Do you end up making the same things for all friends each year, then choosing a different gift each year like me? Or do you make something different each time?