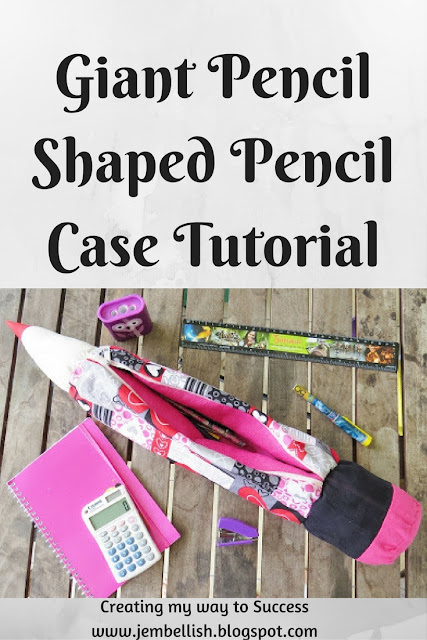
No matter how many pencil cases my daughters have, they always seem to want another. This time I wanted to try something a bit different, and came up with this giant pencil shaped - pencil case, which is perhaps not so practical for them to put in their school bags as it's so large, but is nonetheless quite a cool pencil case I think!
Here's how to make one.
You will need:
3 rectangles: 38 x 32cm (15 x 12.5")
1 x main outer fabric
1 x inner fabric
1 x interfacing
1 strip black fabric for pencil top - 32 x 8cm (12.5 x 3")
1 strip pink fabric for rubber at end - 32 x 5cm (12.5 x 2")
1 square plain fabric for pencil tip 20 x 20cm (8 x 8")
1 square red for coloured pencil tip 6 x 6cm (2.25 x 2.25")
End circles 10cm ( 4") diameter
1 x pink for rubber at end
1 x plain fabric for pencil tip end
3 x inner fabric for inside ends of main pencil case
One Zip 32cm (12.5") long (or longer is ok)
Stuffing
1. Pencil Tip
Take the plain square of fabric, and pin the smaller red square flush on one corner:
Stitch across from corner to corner where the pins are in the above picture:
Trim off the excess fabric on the corner beyond your stitching:
Then fold the red tip back.
Now with right sides of the fabric together, fold in half, matching the seams of your red tip, and pin, then stitch all the way along that side.
Trim as shown in this picture:
Turn your pencil tip right sides out, and stuff.
Then pin and machine stitch one of your plain fabric circular end, all the way around the opening. This is a little fiddly with your machine if you have stuffed the pencil tip firmly.
2. The rubber end of the pencil
Pin then stitch your black and pink fabric strips together along the long edges, right sides together.
Then fold the short edges together, matching the seams up and pin then stitch:
Then take your pink circle, and pin, then stitch that to the pink end of this tube you have created - right sides together.
Turn this right sides out and stuff.
Take a circle of your inner fabric, pin then stitch around the top to seal in the stuffing.
3. Main pencil case
Lay out your 3 large rectangles and your zip like this:
Interfacing, then inner fabric facing upwards, zip facing upwards, then outer fabric facing downwards.
Pin along the zip edge. Then stitch where you have pinned using the zipper foot on your machine.
Now open out the inner and outer fabric on either side of the zip. Open the zip right up, then lift up the raw edges of the fabric and pin together in the same way as before:
Interfacing, then inner fabric facing upwards, zip facing upwards, then outer fabric facing downwards.
Stitch where you have pinned, again using your zipper foot.
4. Putting it all together
This is the trickiest part!
First make sure your zip is still open - this is very important!
Take your pencil tip and insert it facing inwards to one side of your outer fabric pencil case:
Then pin and stitch the raw edges together.
I left the zipper foot on my machine to stitch this, as the stuffed end is very bulky and takes a fair amount of careful manoeuvring to stitch around. I resorted to hand-stitching across the zip part as it proved too bulky and awkward for my machine!
Next, take the rubber end of your pencil case, and push that into the opposite end of the outer fabric main pencil case:
Again pin and stitch all the way around the edge of this. Once again I hand stitched across the bulky edge where the zip was.
Next, take another of the inner fabric circles, and pin and stitch this to one end of the inner fabric main body of the pencil case:
Now with the final pink circle, pin and stitch this ONLY to the top part of your final inner pencil case end, across the zip part. Leave the rest of this open to allow you to turn out your pencil case.
5. Finishing off.
Turn the pencil case right sides out through the opening at the end of the inner part of the pencil case.
Pin then stitch the opening closed.
Then straighten up and admire your Giant Pencil Shaped Pencil Case!
For the free PDF version of this tutorial click here.
If you liked this tutorial, then why not take a look at
There are over 100 tutorials for all kinds of different things and all abilities!


Love it, Jill. Bet the kids do, too!!! This would make a great present...
ReplyDeleteThanks Pam! Yes my kids snaffled it as soon as they saw it and I haven't seen it since - it's gone to school apparently! :)
DeleteThat's fantastic Jill!
ReplyDeleteThanks so much Christie!
DeleteThat is soooo cute!!! I just linked to your post on Craft Gossip (sewing): http://sewing.craftgossip.com/tutorial-pencil-pouch-shaped-like-a-pencil/2013/06/18/
ReplyDelete--Anne
Thanks so much Anne! I always appreciate your features!
DeletePriceless, cute and cool! And as usual, what a great tutorial.
ReplyDeleteThanks Michelle!
DeleteOh this is fantastic!
ReplyDeleteFollowing from Better off thread
Thank you Jane!
DeleteLove this pencil case, its great :)
ReplyDeleteThanks Clairejustine!
DeleteHow fun!!! And what a terrific tutorial too!
ReplyDeleteThanks for sharing at Monday Funday Link Party!
Hope your week is extraordinary!
Thanks Diane!
DeleteHow fun is that? Love it. Thanks for sharing on Becolorful.
ReplyDeletep
Thank you!
DeleteWonderful tutorial! I loved the outcome!
ReplyDeleteGreat post!! I included it in my post Βόλτα στη Γειτονιά!!! ...while sewing!! :)
Have a great weekend!!
Thanks Tina!
DeleteGreat idea, so cute...Thank you.
ReplyDeleteThanks Debora!
DeleteAwesome idea...Definitely making my daughter & son one :)
ReplyDeleteThanks Alina!
DeleteVery cute!
ReplyDeleteThanks Glenda!
Delete