Showing posts with label My Creative Space. Show all posts

Crocheting onto objects

Last week I stumbled across a great little tutorial for making crochet picture frames over at Lola Nova, by crocheting onto a basic bracelet.

Now I have two daughters who have recently grown out of all their bright plastic jewellery - leaving me with a large collection like this:

I've kept them knowing that one day I'll find some use for them - and this just seemed perfect!

So I gave it a go..

It was quite easy to crochet around the bracelet - although my stitches weren't very even - with some looser than others! I only did the basic first layer over the bracelet, the tutorial has further layers to make the 'frame' wider.
But knowing how easy the basic idea is - this is definitely something I will play around with. I showed it to my daughter and she picked it up very quickly. She's been practising and has started attaching them to keyrings and bags, and also making them for her friends!


I tried again using the whole tutorial and ended up with this...


I'm very pleased with it - especially since it's the first whole crochet pattern I've managed to follow!! Still not perfect, but I'm excited nonetheless!!

It's also got me looking around the house wondering what else I can crochet onto?

Any suggestions anyone? What have you creatively crocheted onto?


Crocheting a granny square in My Creative Space


This year I'm learning to crochet together with my youngest daughter (aged 7).

We've been practising with our basic stitches - chain, slip stitch and double crochet - just playing around with them, creating and getting the hang of the hook and wool.

We've made lots of friendship bracelets:

And also lots of ugly little amigurumi monsters - with wonky eyes, lots of missed and extra stitches - but it's been fun to have actually 'made' things, even though our skills are very basic and we're still learning!

My daughter particularly liked playing with adding beads.

It's been good to just practise but I'm now just realising that I can understand (sort of) basic crochet patterns  - which at the beginning of the year when I started out were completely alien and unintelligible to me!

So I decided it was time to focus a bit and see if I can make something with a bit more order to it!

Here's my first try at a granny square:

It's a bit round for a square I know-  but at least you can make out a shape and a kind of pattern in it!


At least I'm starting to get the basic concept of how a granny square is formed - I think I just need some more practise - and probably to try a few more tutorials to find one that speaks to ME! - I find that with something I don't get straight away.  If I have several different people try to explain it to me, then eventually I get it - either as a result of repetition, or perhaps it is finding one that explains it just a little bit differently and my brain finally grasps the concept!
I used to feel like that in my physics lessons at school - but with persistence I always got there in the end!

So - any links to granny square tutorials would be gratefully received.

If you've never crocheted before - then do take a look at my 2 crochet videos - the first is the basic chain and making friendship bracelets, and the second adds slip stitch and double crochet and then shows you how with these basic skills you can play around and make a crazy little monster while you practice! 
It may seem odd that I'm a complete beginner but decided to make a video to show others how to crochet. 
Well - I wanted to have a go at making videos - and I like to encourage others to try things . 
I believe that anyone can do anything they want to - they just have to have the courage to try, make mistakes and not worry about perfection!
My daughter also likes that she can watch the video whenever she wants to help her practice - she doesn't need to wait until I have time to sit with her!

So there you have my crochet journey so far!  I'm going to keep on practising and trying tutorials, and encouraging my daughter to keep  it up too! 

Are you learning any new crafts or skills this year?


\

Reorganising my sewing desk - part two

This week I'm in the process of revamping and reorganising my sewing desk.

So far I've now finished some hanging pockets for the insides of the shelves:
I used pink fabric that I got a whole roll of from the charity shop for $10 a couple of years ago.  The fabric leaches pink everywhere when wet - so I only use it for things inside!
 that I shouldn't need to wash!
I also chose some pink netting for the pockets, so I could see what was in each one!
I've attached them to the edges of the cabinet with small hooks through the wood, and eyelets on the pockets.

I'm really pleased with how these turned out! A great improvement on what it was like before!

I also made a new cover for my overlocker (serger), as I was still using the flimsy plasticy one that came with it:

Much better now!

I've also added a few more hooks at the top of the top shelf for my next organisational project! 

Stay tuned for that!!


Fabric origami box


I mentioned earlier this week that I'm experimenting with fabric origami.

Well yesterday I made this little box.  
To make the fabric stiff enough to fold and hold it's shape better, I used fusible webbing to stick two pieces of fabric together, then cut out a square using a paper template:

I then followed my origami instruction book, and used my iron to help keep the creases in the fabric:


Then I secured the final folds with a couple of handstitches!

I made a paper box and a fabric one to compare:

Quite neat!
And perfect for a little button storage..

Of course as soon as my girls came home from school they claimed the little box, and I'm sure they'll find all sorts of little trinkets to keep in it! 
I can see more of these being made - and more exploration of fabric origami!

Any suggestions of what to try next?


Origami Flowers


A few days ago, a good friend of my daughters had a nasty bike accident.
We went to visit her yesterday, and wanted to take something special for her.  So together, my daughters and I made her a nice bunch of origami flowers!

The quick photos I snapped before we took them over to her house were a little out of focus - but thanks to Picmonkey, I fancied them up a bit so you can see the pretty flowers!


We then poked kebab sticks through the centre and taped the flowers to them - and down the stick to make the stems pretty, before arranging them all in a pretty box we had!


They were well appreciated - and have spurred me on to try some more origami!!
Any recommendations?


Fishy quilt progress in My Creative Space

Over the past couple of weeks I've been showing you my progress on my first ever attempt at a quilt, using a bag of scraps of Great Barrier Reef fabric that I was given.

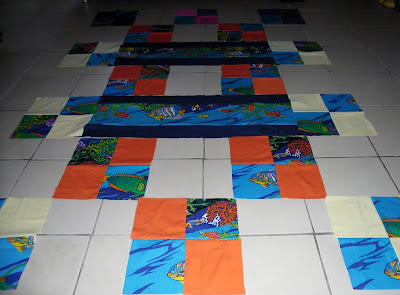
Well I've now finished the front!! Yippee!!

After much shuffling around of pieces..

Stitching and unpicking...and only a few fish ended up swimming upside-down!
It may not be very symmetrical, but it's ....interesting!


And so I'm up to the quilting stage! 

Now to the middle and back of the quilt!
I rummaged through my stash and found lots of bits of fleece - just enough to piece together for the right size!

Hopefully by next week I'll have a finished quilt to show!
That is if I can manage the binding....


Fishy progress in my Creative Space

Last week I showed you a bag of scraps of Great Barrier Reef Fabric that I was given.
Well I've made a little progress with my project!

I've been adding some plain colours from my stash.

So far I'm pretty pleased with it!
Over the next week I'm going to try and fill in the gaps!

I'll show you more next week!!


Something fishy in My Creative Space

A while ago I was given a huge fabric stash from a friend who is moving away.  Part of this amazing haul was this bag full of scraps of Great Barrier Reef Fabric!


Since we live on the doorstep of the Great Barrier Reef itself - I really wanted to make something with this fabric. 
It's all sorts of funny shaped scraps:

So I've started cutting and sorting!!


I do have a plan!!

Now my plans often morph and change as they go on, so I'm going to work on this one for a few days and reveal how it's going next week! 


New dresses in my creative space

 This week I've decided to make a start on some fixing and altering - things that have needed doing for a LONG time!
And as result I now have 5 new dresses!!!
Here's one...


At home, I love to wear these simple cotton dresses. They're cool and comfortable. I have lots of them - but still couldn't resist buying a few more on our family holiday to Bali last year!

At just around $3 each, they're such a bargain - and of course are 'one size fits all' so I didn't try them all on!

Unfortunately when I got home there were 3 that just didn't fit! So they got added to another 2 dresses which didn't fit (a friend had got me them a year earlier on her holiday to Bali)

So - 5 new pretty dresses, sitting in a cupboard for months and months, waiting......waiting....waiting to be altered!!

This week I finally got a round tuit!

Here's the dresses I altered!


Two of them were too baggy - so I just took them in at the sides a little, using another dress as a size guide:

The other 3 were just too tight under the arm, so I cut the seam open and made it a little wider!

Ta Da!

A little creased after all that time waiting in the cupboard - but at least now I can iron it and wear it!!

I sew almost every day - making things, creating new patterns etc, but these little fixing and mending jobs, although simple, easy and quick,  always seem to get left undone!!

Do you have jobs like this that you leave and leave and leave???

One of my new years resolutions this year was to get things like this done!
Almost half way through the year now - but hey! at least I've made a start!!