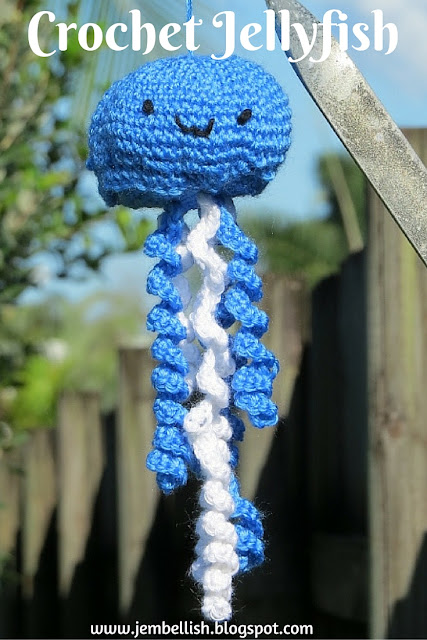
Crochet Jellyfish


Last week on Facebook, somebody shared this link to a crochet jellyfish pattern. It came at just the right moment, when I was looking for my next crochet project.

I jumped in straight away and had a go!
I had to look up how to make a magic circle again - but I think I've finally got that mastered now.

The next thing to practise was counting those stitches and rounds. I got lots of practise using my times tables as I counted the various combinations of stitches into each loop. I know I should use a stitch counter or at least a paper clip to keep my spot and make that all easier, but I kind of like playing around with numbers in my head and it helped me to concentrate on my stitches too.
Generally I think I counted well, but I may have ended up with a few extra stitches in my final few rounds somehow...

Making the tentacles was fun, although I think I should have done a few more! I got a bit over excited about finishing and seeing the jellyfish hanging up!


I'm really pleased with how my jellyfish turned out.
Now I just have to find somewhere to hang him!

I'm always on the look out for new projects to practise and improve my crochet - so feel free to suggest any - leave me  a link in the comments!


Upcycled Denim Kangaroo Patchwork Pillow


I haven't done any clothes upcycling in a while and thought it was about time I started tackling my large stash of old clothes - in particular jeans.

I have lots of scraps of denim, left over from old jeans and many projects to upcycle them. I keep even the smallest of scraps, so was looking for something to make with them.

Paper piecing is something I've been wanting to try for a while, so I figured that was a good thing to combine with my denim scraps and give it a whirl!

I have a few books and patterns given to me by a friend a few years ago, so I chose one of those,

and a pattern from it to try.


I have to admit I didn't follow the paper piecing instructions too carefully - I printed the template onto some thin cardboard

 then cut the pieces out and kind of held them on my denim scraps and cut around them with a rough seam allowance!

I did follow the order to join the pieces together though - and think I did ok for my first try (considering I wasn't too careful with cutting my seam allowances!)

So then, what to do with this kangaroo block?

Inspired by a recent post from Anna of Tea and a Sewing Machine, I decided to make a cushion cover. Nice and simple!

So I added a border to my kangaroo block using more pieces of denim from the remains of a pair of jeans which had already been cut.

Then for the back of the cushion, I decided to try something I'd seen on Pinterest - a patchwork of jeans pockets. which I stitched together in a very random order.

So here are my 2 cushion cover sides (before trimming) with an old cushion.


And then trimmed, with a zip and ready to join together!

I simply stitched the zip across the top and joined the sides to make the cushion cover. 
I'm really pleased with how it turned out!


Although a little fiddly with the small denim pieces and the thick seams denim produces, I like the effect of this denim paper piecing and think I might try some more.
I have plenty of scraps to work with anyway!


My daughter came home and told me my cushion looked professional! Praise indeed!


So what do you think?
Anyone have any tips for a novice paper piecer?

I have several upcycling tutorials to browse through - many of which use old jeans to work with. Go here to see them all.


Make your own Reusable Fabric Bowl Covers in 5 steps and 15 minutes


For a long time now I've been wanting to make myself some of these fabric bowl covers. I remember when I was a child, we used to have a set that we used when we ate outside in summer, to keep the flies off the food.  
Nowadays I have just been using cling film (glad wrap) to cover my bowls - and feel bad every time I do it thinking of the plastic waste I'm creating!


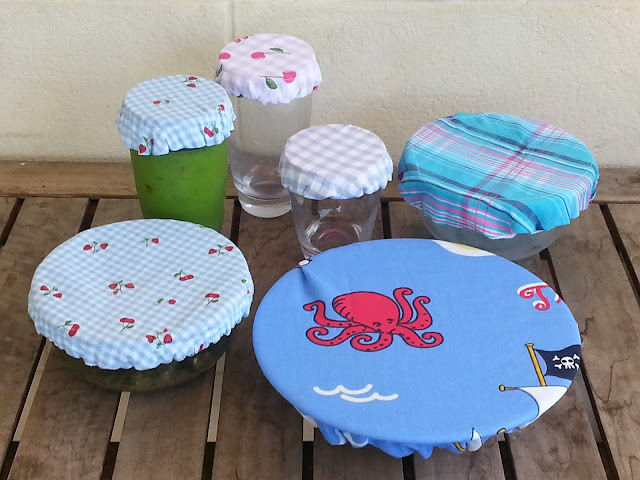
So I finally got around to making myself some, and thought I'd add another new tutorial to show how easily you can make your own Reusable Fabric Bowl Covers.


All you need is some fabric, elastic and paper for a circle template.
I just used simple cotton fabric from my scrap boxes. I can just through them in the washing machine with a regular wash every now and then to keep them clean.  
For the elastic I used pieces reclaimed from the adjustable waistbands of old worn-out kids' pants!
You can make these covers any size you need.


So here is now to make your very own Reusable Fabric Bowl Covers in just 5 steps and 15 minutes!


1. Cutting out
Cut a circle of paper around 5 cm (2") wider than the bowl you want to cover.


 Lay your two fabrics right sides together and pin on your circle template. Cut.


2. Stitch the circles
Stitch the two circles together around the outside, leaving a small gap, then turn right sides out and iron.


3. Making the casing
Cut your elastic just smaller than the diameter of the top of the bowl you want to cover. Then stitch around your circle in from the edge wide enough to allow space to thread your elastic through.


4. Adding the elastic
Using a safety pin, thread your elastic through the casing you just created. Stitch the ends together securely, 


5. Finishing
Finally, top-stitch the opening closed, either by machine or hand.


And there you have a finished fabric reusable bowl cover!


You can make them whatever size you choose - to cover bowls, plates and cups.
I made several sizes and used up some of my scrap fabric in the process.


I'm really pleased with how they turned out.
Cute, functional and eco-friendly! What could be better?

For the free downloadable PDF version of this tutorial, click here.

And for more sewing tutorials showing things you can make in just 5 steps and 15 minutes - go here.


Crochet Granny Square Bracelet


This week I've been getting back to my crochet learning.
After a few weeks off thanks to a holiday and family visit, I found I'd forgotten how to make a Granny Square!

So I relearned that and practised by making a few using a selection of embroidery thread I was sent a few years back and still haven't managed to use!

So then, once I felt I had the hang of it again, I had to decide what to do with all these little squares.

So I learned how to join Granny Squares together using

Just a simple slip stitch through both squares you're joining!


My least favourite part was weaving in all the ends!


But I'm quite pleased with how neat I managed it! Not perfect, but not bad for my first try.

I just kept on joining until they all formed a circle, and hey presto - I'd made myself a bracelet!


So now I have a matching bracelet and earring Granny Square set (the earrings I made a few weeks ago)!


I think I might keep on with the Granny Squares for now - there seems to be plenty of things you can make with them!

As always, any and all suggestions welcome.