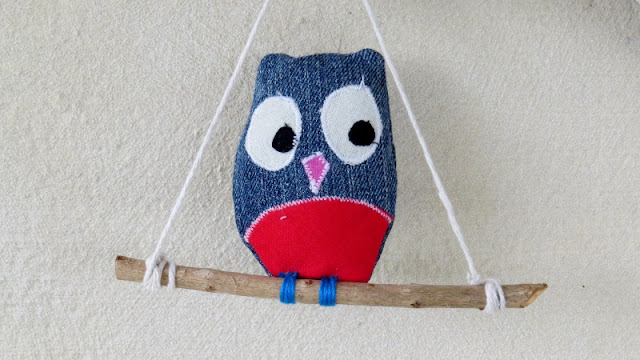
I saw perching fabric owls on market stalls when we were travelling in Asia at the beginning of this year and wanted to try making them myself.
So since I have a growing pile of scrap fabric from this year's clothes upcycling challenge,
I thought I'd use those scraps to give them a go.
First I drew a basic owl shape to use as my template. You can download the PDF of that here.
Here's how to make a perching owl.
Using the template, cut two main owl bodies. I used denim scraps from old jeans for this.
Then for the features. I used white and black for the eyes, pink for the beak and coloured scraps for the tummy. For these features you will need to use fusible webbing ironed onto the back of your fabric, and then cut your pieces from that, which you can then iron on.
Every time I use this fusible webbing for an appliqué project, I keep the offcuts - so I had a bag full of scraps to cut owl features from too!
Here's my three owls with the features cut out and ready to iron on.
Using a damp cloth on top of the features, press with a hot iron to stick the pieces to one main owl body.
Then using the applique stitch on your machine, or a tight zig zag, stitch around the features to secure them.
Your owls are now ready to put together. Pin the two main owl body parts, right sides together.
Stitch around the edge, leaving a gap in the base to turn the owl right sides out.
Then clip the tips of the ears and the curves a little.
Turn your owls right sides out, and stuff with fabric scraps. I used the really small scraps and threads from my thread catcher!
Once your owls are stuffed, hand stitch the openings closed. Now you're ready to make them perch!
You will now need a stick for your owl to perch on, some embroidery thread for the 'feet', some string and some invisible thread.
Take your owl and a needle threaded with some coloured embroidery thread. Stitch loops around the stick and through the base of your owl where you want the 'feet' to grip onto the stick.
Once the owls feet are secured, you need to tie some string to the stick on either end with a loop in the middle big enough to hang the owl up.
Finally using some invisible thread, secure some thread from the centre of the top of the owl head and then tie around the top of the string loop where you will hang the owl. this will stop the owl toppling off his perch!
Now your owls are finished. Hang them up and admire them!
For the free downloadable PDF version of this tutorial, click here.
I think these owls will make a cute addition to the school carnival stall, what do you think?
To see what else I made from clothes to sell at the school fair this year, go here.


So cute, well done!!
ReplyDeleteThanks so much Esther!
DeleteOh, what a fabulous idea you brought back from your travels - I love them so much! Too cute for words, and I bet they will sell like hot owl cakes!
ReplyDeleteHee Hee - thanks Mich - hope they do sell well!
DeleteThis is the most darling little craft - I just love it! I'm visiting from Two Uses Tuesday blog hop.
ReplyDeleteThanks so much!
Angie
Thank you Angelique!
DeleteVery cute, all the better as they use up scraps!!!
ReplyDeleteThanks Vicky!
DeleteThese are so adorable Jill, well done! Congrats on the feature! :)
ReplyDeleteThanks Michelle!
DeleteOh my! So cute! Pinned and tweeted. Please join us tonight at 7 pm, and party with us. I can't wait to see your new masterpieces or amazing classics! Lou Lou Girls
ReplyDeleteThanks so much Kimberly!
Delete