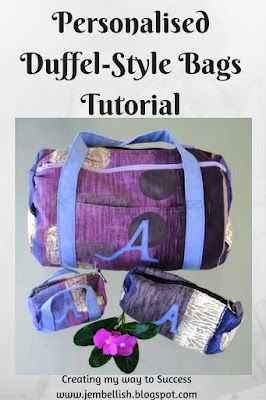
This easy to follow and information packed tutorial shows you how to make not just one, but all sizes of this versatile duffel style bag.
The keychain size:
The pencil case size:
The handbag size with several pockets and clips:
And the overnight or airline carry-on size:
The tutorial includes all measurements, pattern pieces,
and clear photos and instructions for every step, including how to custom make any size duffel you choose!
and clear photos and instructions for every step, including how to custom make any size duffel you choose!
I have made sets for myself, and both my daughters with our initials on:
I also made one with rip-stop nylon fabric for my daughter to use as a waterproof swimming bag.
I have made sets for my daughter's friends..
And an extra gym bag for myself with longer straps..
So - if you would like a FREE copy of this PDF tutorial, just
to go to the download!
To see my other free sewing tutorials, over l00 of them for all levels of sewing ability, go to
Happy Sewing!


.jpg)
.jpg)
.jpg)
.jpg)
.jpg)


I love handmade bags! I think that it's extra special with the appliqué initials.
ReplyDeleteThank you!!
DeleteYour bags are fabulous! I love that they're personalized and come in so many sizes!
ReplyDeleteThanks Lisa!
DeleteThese are very nice Sets!My favorit is silver with red!COOL
ReplyDeletehttp://freestilcreatingbyvilly.blogspot.gr/2013/02/blog-post_6082.html
Thanks Anastasia!
DeleteNice collection. Love the blue ones!
ReplyDeleteThanks Tanya!
DeleteI love the blue ones! Great Job!
ReplyDeleteThank you!
DeleteI don't seem to get anything when I go to download the pattern and instructions. Is there a glitch???
ReplyDeleteThanks in advance.
Sandy Corey
My email is
ReplyDeletesrc419@hotmail.com
Sandy Corey
Hi Sandy - just sent you an email with the link in again. I checked it here and it seems to be working fine!
DeleteJill they are fantastic, I'm so giving these a go :)
ReplyDeleteThanks Mel! Let me know how they turn out if they make them!
DeleteAmazing projects Jill! Love all especially the straps in little bags! Thanks for sharingfantastic tutorial!
ReplyDeleteHave a wonderful week!
Hugs from Portugal,
Ana Love Craft
www.lovecraft2012.blogspot.com
Thank - you Ana! Hope you have a great week too!
DeleteLove your bags, they are great :) Thanks for linking up to Creative Mondays ...
ReplyDeleteThanks Claire!
DeleteFound you through Sew Many Ways Find a Friend Friday. Love your blog!
ReplyDeleteI would love for you to share and link up at my TGIF Link Party.
http://apeekintomyparadise.blogspot.com/2013/05/tgif-link-party-2.html
Hugs, Cathy
Thanks Cathy - and for the invite to your party. I shall come on over and take a look!
DeleteOh wow!!! Love the duffel bags!
ReplyDeleteThanks so much for sharing this at The DIY Dreamer.. From Dream To Reality!
Thanks Christine!
DeleteI can't access the tutorial, just get a blank page. Can anyone help?
ReplyDeleteNancy Massi
saileach@yahoo.com
I can't access it either. It's a blank page with 'Personalized Duffel Style Bags'.pfd. I can't download the tutorials either. :(
DeleteHi Nancy - I've emailed you the direct link, hopefully you can access the tutorial that way!
DeleteAnonymous - if you email me then I can do the same for you!
I have tried to download the pattern but my internet connection is REALLY slow (I live in the middle of no where) could you please email me the pdf ??
ReplyDeleteroxanna789@gmail.com
Have emailed it to you just now! :)
DeleteI have another question. Sorry to ask a million questions. Do you only use the fusible webbing for the monogram letter or the whole bag?
ReplyDeleteHi Niki,
DeleteI just use the fusible webbing to attach the monogram to the bag. Nowhere else! :)
Hi Jil.
ReplyDeleteThank you so much for this beautiful tutorial. I have downloaded it but cannot seem to get the templates? Perhaps you can assist? Riana.russouw@gmail.com.
Thank you once again for sharing.
Riana
Hi Riana, So glad you like the tutorial. The templates should be on the last two pages of the tutorial. If you scroll through to the end you should see them. Just in case you can't find them, I have emailed you the tutorial with templates! Happy sewing!
DeleteHi there! These look awesome. Before I start. Do you think that the overnight size would be a good size for a wrestling/american football gear bag?
ReplyDeleteHi Cassandra. Thank you first of all, so glad you like the bags. I'm sorry but I'm not familiar with wresting or American football gear so I'm not sure if the overnight size would be big enough!
DeleteHi Jill!! I wanted to thank you for your generosity on sharing these tutorials; they are super useful and easy to understand
ReplyDeleteMy pleasure Celina! So glad you like them!
DeleteHi Jill,
ReplyDeleteI am making a duffle bag for my sister-in-law for Christmas. One of the overnight size ones, but my sister-in-law prefers square ends. What is the easiest way for me to modify the circle into a square so I can keep the measurements of the bag all proportional? Thanks! Amy
Hi Jill!
ReplyDeleteLove this bag. I'm making it for my sister-in-law for Christmas, but she prefers square ends rather than circle. What is the easiest way to modify this while keeping all the measurements of the bag proportional and correct? Thanks! Amy
I am assuming it would just be the length of the material divided by 4 (leaving a little excess for the zip seam). Is this correct?
DeleteHI there
DeleteSorry for the delay replying, I was away on holiday. Yes, you're absolutely right for how to make square rather than round ends! Happy sewing!