Showing posts with label scrap projects. Show all posts

10 Fun Scrapbusting Projects


It's the time of year for 'September Scrapbusting'  so I thought I'd round up a few Fun Scrapbusting Sewing Tutorials!


I hope you have gained some inspiration from these tutorials for things to make with your fabric scraps.

For plenty more sewing tutorials to make all kinds of things, please do visit


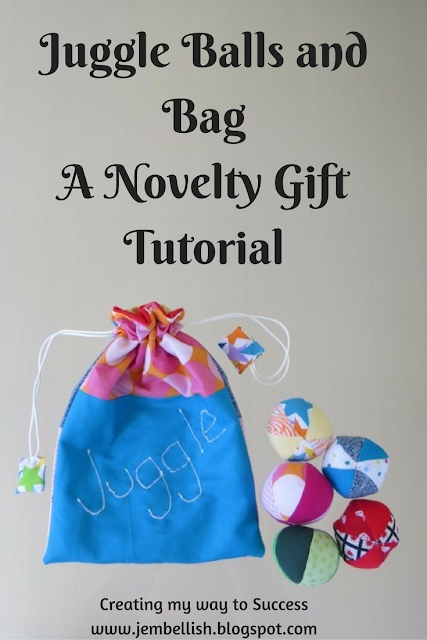
Juggle Balls and Bag - a novelty gift tutorial


Challenge 10 of our 12 Days of Christmas DIY Challenges is to make a stocking filler gift from fabric scraps.  I've made plenty things that fit this challenge over the past few years - with many of those tutorials to be found in my round up of 

But of course I had to make something new for this challenge so this is what I came up with. 

A set of juggle balls and a special 'juggle' bag to put them in!
Here's how you can make your own novelty 
Juggle bag stocking filler gift!

You will need:
Fabric Scraps
Stuffing
Cord or ribbon for the drawstring bag.


First to make the balls
Cut a piece of scrap paper 8 x 4 cm (3.25 x 1.5")

Fold your paper in half then half again. Open out and then re-fold length-ways.  Cut from the fold up to the centre crease in a curve and down to the other folded edge to make an oval shape as shown in the picture below.


Use this paper template to cut 6 pieces of fabric, I chose 2 of each of 3 different fabrics, but you can choose all the same or all different, whatever you like!

Now sew these pieces together, one by one with right sides of the fabric facing along one side of each piece.


When you have joined all your pieces and just have the gap at the end, pin your first and last pieces together, right sides facing, but when you stitch this time, leave a gap to turn your ball right sides out!


When you have finished stitching, turn your ball right sides out through the gap.


Then stuff until firm.

And hand-stitch the opening closed.

And that is one ball finished!

I made 5 balls of different colours for my bag.


To make the drawstring bag
I used my own 'simple drawstring bag' tutorial for this bag - which you can find here.
I used more of the fabric scraps I had used to make the balls, but none were big enough for the bag on their own, so I had to patch them together to make pieces big enough to work with! You can either do this or if your scraps are larger than mine, just cut them to size.

To add the word 'juggle' to one side of the bag, simply write the word on the fabric using a white pencil. You can just faintly see it here in the picture.


Then set your machine to a very tight zig-zag (applique) setting and stitch over the letters you have written.


Now follow the tutorial to make your drawstring bag.

And your stocking filler gift is ready!

This would be the perfect stocking filler for kids - a fun new skill for them to play with and try to learn!

For the free downloadable PDF version of this tutorial, click here.

What stocking filler gifts will you make from your fabric scraps - or have you already made one?  Please do link up your own answer to this challenge in our linky party here. It will stay open until Christmas so there's plenty of time to link up your projects and be inspired by others!

--------------------------------------


Each day a challenge will be set by means of a video and blog posts giving some suggested ideas and crafts. These posts will also contain a linky party for anyone and everyone who wants to join in to link up their projects - both past and present, that answer the challenge.  The linky party can be found on all our blogs and we'll  try and come up with different ideas and tutorials for the challenges too. So please do visit us all, and then share your ideas with us as well! We're looking forward to seeing how these challenge are met!


Ready, Steady....Let's Christmas Craft!


The 12 Days of Christmas DIY Challenges is brought to you by


My Pincushion Swap


This year I joined in with my first ever 'swap'. I've seen them mentioned here and there but never really looked into them.  Then this Pincushion Swap with The Scrappy Girls Club popped up and I was inspired to join in!

I've only ever made a couple of pincushions but have been pinning lots on my Pincushions Pinterest Board as there are so many cute ones out there!

I was matched up with a lovely lady called Jenny right here in Australia.  We had filled out a form detailing what colours and fabrics we liked and had been matched up by the Scrappy Girls Club. 

I browsed through lots of Pincushion patterns, eventually settling on this one for a Mini Pouf Pincushion.
Mine didn't turn out quite the same as the picture from the original tutorial.


And when I tested it out with some pins - I felt bad that poor Humpty Dumpty was spiked so much!!


So had to move the pins a little!

I packaged the mini poof pincushion up with a few extra goodies.

A set of fabric coasters I made using scraps of 'Great Barrier Reef' Fabric I was given by a friend.


A small but cute Zip-itself coin purse, which I learned how to make last year.


And then a couple of upcycled denim goodies - because that's just 'me'!
An elephant keychain..


And a boxy denim zipped pouch.


In return, I received the most wonderful package from Jenny.


With not one but TWO gorgeous pincushions!


A beautiful Selvedge Zippered Pouch,


AND some beautiful fabric too!


And all the little details - buttons, zips and tags were just lovely!


I think it's such a lovely idea to connect with other crafters and exchange handmade gifts. It was so exciting to receive my package and I hope my swap partner likes hers too. Hopefully it has arrived now!

I'll definitely be joining in another swap - maybe next year's Pincushion swap - but want to practice making Pincushions before then, so I can come up with a fabulous one to send next time!

Have you ever joined in a swap? What did you swap? And what extra goodies did you send or receive? I would love to hear other swap stories!


Owl Pouch Tutorial - scrapbusting project


I've seen a lot of owl purses and bags around and finally decided to try making one for myself! I chose to make a small zipped pouch - trying a different method for the zip to usual, and I'm really pleased with the result!

The finished pouch is approximately 13 x 9 x 5 cm (5 x 3.5 x 2")
I made it using just fabric scraps and a small zip.
Another great idea for a small gift or stocking stuffer!

Here's how to make one of your very own!


First cut your pieces.
You will need.
2 pieces Inner Fabric 16 x 12 cm (6.25 x 4.75")
1 piece Outer Fabric 16 x 12 cm (6.25 x 4.75")
3 pieces Outer Fabric 16 x 5 cm (6.25 x 2")
1 Zip 18 cm (7")
2 pieces Outer Fabric 5 x 5 cm (2 x 2")
4 Pieces Outer Fabric  12 x 3 cm (4.75 x 1.25")
Small white, black and yellow scraps for eyes and beak. Felt is ideal - or if you have scraps with fusible webbing.

Cut a paper rectangle 4.5 x 4 cm (1.75 x 1.5") and round 2 corners to make a 'feather' template. Use this paper template to cut your owl feathers - 12 pairs of assorted patterned fabric. 
(see above picture for the approximate shape)

The Feathers
Take each of your 'pairs' of feathers and with the fabric right sides facing, stitch around 3 edges. Then turn each one right sides out - a chopstick may help!


Now you want to attach your feathers to your front panels.
Take two of your outer fabric pieces, 16 x 5 cm (6.25 x 2").
Pin 6 'feathers' along the top of each piece, slightly overlapping them. You should have a small gap on either side of the feathers.

Stitch these into place along the top edge and remove the pins.
Then place one piece face down on top of the other, pulling the feathers out of the way.

If you gently pull the top piece back you should see the feathers all pointing downwards like this. Stitch along the top line where you have pinned.


The face
Cut eyes and a beak from your white, black and yellow fabric, and place in the centre of your final outer fabric piece, 
16 x 5 cm (6.25 x 2").

 I keep all the scraps from my appliqué projects, so I always have scraps ready to cut and iron into place. But felt or other stiff fabric would work - you could pin or glue into place, then run a tight zig- zag or appliqué stitch around all the edges.

Place this piece above your two feathered pieces. This will make up your front pouch panel.

Flip the top face piece over and pin along the top edge to the top of your feathered panel. Stitch along the top edge where you have pinned.


Outer pouch
Now your outer fabric pouch pieces are ready to join together.


Place these two pieces right sides together and pin, then stitch around the side and bottom.

Now you're going to 'box out the corners'. Reach inside the pouch and open up the corner a little. Pinch the corner from the outside so the side and bottom seams are in line with each other. Place a pin across the corner.

Repeat this with the other bottom corner. Your pouch should now look a little like.. an owl!

Stitch across each corner about 2.5 cm (1") from the pointy end. Then snip off the triangle corners outside your lines of stitching.


Turn your pouch right sides out. This part is now finished!


Inner pouch
Take your two inner fabric pieces and place them right sides together. Pin and stitch around the sides and bottom, but this time leave a gap in the bottom. You will need this to turn the pouch out at the end.

Box out the corners of your inner pouch in the same way as you did for your outer pouch.


The Zip
Take your two outer fabric pieces, 5 x 5 cm (2 x 2")
Fold each one in half, right sides facing and stitch down the two sides.

Trim the seams close to your stitching lines.


Turn each piece right sides out and slip over the ends of the zip.

Tuck the raw edges in on both sides and pin, then top-stitch around all four edges of your fabric zip end.


Now take your final four outer fabric pieces, 
12 x 3 cm (4.75 x 1.25").
Note - my pieces are slightly bigger in this picture - 5cm instead of 3cm. I cut them down after I'd stitched them when I realised they needed to be shorter!


For each piece turn the shorter edges over a little and stitch to hide the raw edges.


Place two pieces, right sides together on either side of the zip with the raw edges lined up with the zip edge. Stitch using your zipper foot.

Pull back both pieces from the zip teeth and top stitch.

Repeat this with the other two outer fabric pieces on the other side of the zip.


Putting it all together
Open up your zip and place it upside-down over the top of your outer pouch, so that the right sides of both fabrics are facing. Pin both sides to the main pouch, lining up the raw edges. Then stitch in place.


Now push the outer pouch piece inside the inner piece so that the right sides of both fabrics are facing each other. The inner pouch is inside out, and the outer pouch is the right side out.

Line up the top raw edges and pin, then stitch all the way around.

Now turn your pouch out through the hole you left in the bottom of your inner pouch.


 Hand stitch the opening closed.


Push the inner pouch inside and your Owl Pouch is now finished!

Fill it up with whatever you choose. Money, toiletries, small pens and pencils, are just a few suggestions.
I think this pouch is the perfect size for a nail care kit!


For the free downloadable PDF version of this tutorial, click here.


I hope you enjoyed this tutorial.
I have over 100 free sewing tutorials to make all kinds of things and for all levels of sewing ability.
So do go and take a look at