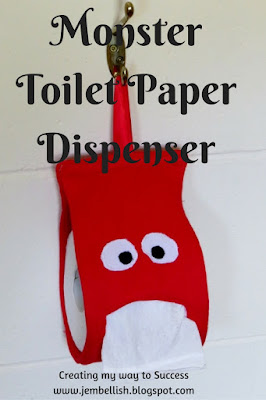
This year I'm trying to find ways to make novelty gifts for Christmas that are both eco and budget friendly, as part of my Christmas Shouldn't cost the Earth series.
This week I've made this super simple toilet paper dispenser that I've had 'pinned' for a long time after finding them for sale on ebay.
Here's how to make your own!
You will need
Two pieces of fabric 50 x 13 cm (20 x 5")
A piece of ribbon 18 cm (7") long
Scraps of black and white fabric for the eyes - or craft eyes!
First attach the eyes about 10 cm (4") down from the short end of one of your fabric pieces.
I used iron on fusible webbing and appliqué stitching, but you could just stitch on the scraps by machine or hand - felt would work well as it doesn't fray. Or hand-stitch on some googly craft eyes!
Next take your ribbon, fold it in half and pin then stitch it to the top centre of the same piece of fabric, above the eyes.
Now place your other fabric piece face down on top of this one and pin around all edges. Make sure the fabrics are facing right sides together, and leave a small gap in one side so you can turn it right sides out after stitching.
Clip the corners,
then turn the whole thing out through the gap you left in the side.
Pin the opening closed,
then top-stitch around all four sides.
The mouth
Measure down 17 cm (6.5") from the top ribbon and place a pin in to mark this point.
Fold the fabric in half lengthways and snip where the pin is with your scissors.
Open the fabric out and make this cut line longer until it stretches to about 2.5 cm (1") away from either side edge.
Next make the opening wider like a mouth by cutting both upwards and downwards.
Snip a little into each inside corner of the mouth.
Then fold the fabrics in from the front and back to hide all the raw cut edges. This is fiddly and does take a little bit of time. Pin.
Top-stitch around the mouth opening.
Finally, fold the fabric in half and pin, then stitch, across the top.
And that is your monster toilet paper dispenser finished!
Pop a roll of toilet paper into it, hang it up and you're ready to roll!
With the ribbon it can simply hang on a hook, but it does also fit on a regular paper roll holder.
Such a cute novelty gift - a perfect little stocking filler don't you think?
For the free downloadable PDF version of this tutorial, click here.
To see what other Eco and Budget Friendly Christmas Crafting Ideas I've shared so far - go here.
And for plenty more Christmas Crafting inspiration, check out our group


Woaah, my children would love this!
ReplyDelete;)
Thanks Christiane! My kids wanted this one as soon as they saw it!
DeleteHaha that's so cute Jill!
ReplyDeleteThanks for sharing this at Cooking and Crafting with J & J.
Thanks Julie!
DeleteThis is such an adorable idea! :)
ReplyDeleteThanks for joining Cooking and Crafting with J & J!
Thanks Jessica!
DeleteHi Jill
ReplyDeleteThis is way too cute. I'm making this for the boys bathroom. They will love it!
Thanks for sharing your awesome creation with us at Wake Up Wednesday Linky Party.
Hugs my friend
Angel
Thanks so much Angel! :)
DeleteThis is hilarious!!
ReplyDeleteThank you!
DeleteSuch a cute idea! Would certainly be a surprise whenever a guest visited our bathroom! lol!
ReplyDeleteHee Hee - yes a nice surprise for guests!
DeleteThis cracks me up but would be so cute in a kids bathroom none-the-less! I just had to put it on facebook!
ReplyDeleteThanks Jennifer!
DeleteI'm dropping by from Katherine's Corner link party. This is such a fun idea. I absolutely love it. You are so clever -- and it's wonderful that you've come up with a great idea for an eco-friendly and cost-efficient gift.
ReplyDeleteI have a link party that I'm trying to grow. It is Grandma Ideas Sharing Time at http://grandmaideas.com. I invite you to share this idea (and a couple of others) because I know that my readers will enjoy this idea as much as I do!
My link party runs from Wednesday at 1:00 a.m. through Friday night at midnight Mountain Daylight time in the U.S. I hope you can make it.
All the best,
Nina
Thanks Nina - I shall pop over to have a look at your party!
DeleteThat is so cute!! I've got a post scheduled for later this morning that links to your tutorial: http://sewing.craftgossip.com/?p=84597 --Anne
ReplyDeleteThanks so much for the feature Anne!
DeleteHiya, Thanks for sharing with us.... I have chosen this as my favourite post for this weeks Wake Up Wednesday over at PrettyShabbyUk.Com.. Hope to see you again next week xx
ReplyDeleteAw Thank you!!
DeleteOh wow, this is so much fun, what a great idea JIll, love it :)
ReplyDeletePinning now!
Thanks for sharing at Creative Mondays
Thanks so much Claire!
DeleteThis is *so* cute! and creative! Pinning!
ReplyDeleteThank you!!
DeleteOh Jill!!! This is so cute! What a great and unique way to decorate for Halloween!
ReplyDeleteThanks Christine - it's been a big hit with everyone!
DeleteLooks like something fun for kids. Love your sock monkey's too!
ReplyDeleteWhy thank you!!! :)
DeleteHey Jill, how are you? Just letting you know I'm featuring this and any of your other Halloween themed posts at a Halloween round up tomorrow. Thanks for always linking up. I really appreciate it. (Hope you had a successful day at the Coconut Carnival.)
ReplyDeleteAnne xx
Thanks so much for that Anne! Can't wait to see the other features.
Delete