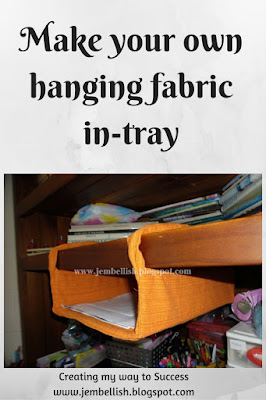
We're pretty short on space in our house - I'm sure lots of people are!
Something I've really been needing a space for is the kids homework. They have to do a little each day, so the papers and books tend to sit on the dining table or on the sofa or somewhere close at hand so they don't get forgotten or lost!
So - time to sew up a solution!
A Hanging Fabric In-Tray!
Between my girls desks, is this old TV cabinet - that is chock-full of books and stationery supplies!
There was a little bit of space under one of the shelves that just wasn't being used!
Just perfect to hang a new tray for them to keep their homework in!
So if you're short of space like me - here's how you can make your very own
Hanging Fabric In-Tray!
You will need some fabric, stiff cardboard and a couple of old wire coathangers!
I used a pair of pliers to untwist and shape the coathangers into a shape that would slide onto my shelf and then form the sides of the in-tray.
I just kind of eyeballed the size - and tested it on the shelf as I bent the wire.
So I ended up with two pieces of wire bent like this:
Next I used an old plastic in-tray to measure up for the sizes of fabric I needed.
You don't have to be terribly accurate for this - and can make it slightly bigger or smaller depending on what you want to use it for!
Here's the measurements I used:
2 x Base pieces 37 x 28cm (14.5 x 11")
4 Long side pieces 37 x 10cm (14.5 x 4")
2 x Back pieces 28 x 10cm (11 x 4")
2 x wire cover strips 45 x 8cm (17.5 x 3")
Once you've cut your pieces, lay them out and pin together like 2 in-trays:
Stitch along the sides and edges, then put them one inside the other - right sides together:
Then pin all around the top edge:
Stitch, then turn right sides out:
Cut a piece of stiff card slightly smaller than your 'back' fabric piece, and insert into the back of your in-tray:
Now pin around this card in the seams, and also along the two longer edge seams too:
Carefully stitch these seams together where you have pinned:
IMPORTANT NOTE:
Only stitch to within 3cm (1") of the open end of your in-tray! This will allow you to fold the ends in to finish them at the end.
Now cut some cardboard slightly smaller than your fabric sides and base and insert:
Now you can slide in your re-shaped wire coathangers. You're almost done!
Now take your long wire cover strips of fabric. Fold in half lengthways with right sides of the fabric together and stitch across one short end and along the length. Do this for both strips.
Then using a chopstick or knitting needle, turn your 'tubes' right sides out:
Now slip these covers over the wire coathangers and tuck the raw edges into the in-tray!
Tuck the ends in on themselves and pin together:
Finally, stitch the ends close - going as close to the wire hangers as you can without breaking your sewing needle!!
And there you have, one hanging fabric in-tray!
It may not stay as rigid as a store-bought one - but the wire hangers can always be re-bent if the tray sags a little!
I'm happy that we now have a special spot to put the homework! Another small victory in trying to keep my surfaces clear!
For the downloadable PDF version of this tutorial, click here.
If you liked this tutorial, there are over 100 more free sewing tutorials for all levels of sewing ability on
so please do go and take a look!


Very creative idea, Jill! I love how you re-purposed those wire hangers to make your tray.
ReplyDeletebrilliant idea! thanks for sharing. very useful, i should try this for organizing.
ReplyDeleteWhat a cool idea!!!
ReplyDeleteHugs
And thanks
SueAnn
That is darn clever Jill. I, too, have space issues and could see using something like this for those papers that somehow (?) are loose everywhere...
ReplyDeletenice idea thanks love it
ReplyDelete