

This year, my girls have been doing more and more sewing, and recently they spent some time pattern testing the tutorials for my new e-book (Teach your kids to sew with a pair of Jeans).

So I wanted to make them something to say 'Thank-you' and something they could use in the years to come when they sew.
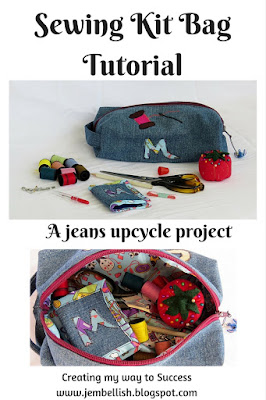
I decided on small boxy bags, made from denim upcycled from jeans, filled with sewing things including special little personalised needle cases and cute tomato pincushions.
Both girls loved their gifts, and so did I! I think I might have to make myself one too!
This one is my younger daughter's.


And this pink and white one is my elder daughter's.


Here's how to make your own, if you'd like one of these personalised sewing kits - either for yourself or for a friend or perhaps for your child to encourage them to sew!

The Sewing Kit Bag
You will need,
2 main outer pieces of fabric (I used denim) 34 x 20 cm (13.5 x 8")
1 piece outer fabric for the strap 18 x 10 cm (7 x 4")
2 inner pieces of fabric 34 x 20 cm (13.5 x 8")
1 zip longer than 34 cm
Fusible Webbing
Fabric Scraps for appliqué

First your appliqué
You can choose to add any kind of pictures or lettering you like on this bag. I chose to add an initial letter on one side,

a sewing machine on the other side

and on the top, a pair of scissors and a needle and thread.

I just drew these pictures freehand - the template of my drawings can be downloaded here if you're interested!
Choose the designs and the fabrics you want to use. Then iron your fusible webbing to the back of your pieces. Draw your designs as a mirror image on the paper side of the fusible webbing.

Cut the designs out then peel off the backing and iron onto your main outer fabric rectangles.
The fabric will be split into thirds when the case is finished. The top third, side third and underneath third.


Appliqué or zig zag stitch around the edges of all your letters and pictures to secure them in place.

Now to put the bag together
Lay one of your outer fabric pieces right sides up. Put the zip face down on top of this at the top, then one of your inner fabric pieces face down on top of the whole thing. The fabrics should be right sides facing.

Line up the top three edges and pin then stitch into place using your zipper foot.

Pull both fabrics back from the zip and top-stitch close to the zip teeth. This is to prevent the fabric catching in the zip when you open and close the zip.

Now the other side. Place your other inner fabric piece face up, then lie the part you just made with the zip face up on top of that and finally your other outer fabric piece face down on top. Basically you want your inner pieces right sides together and your outer pieces right sides together.

Pin then stitch across the top with your zipper foot.

Then once again pull back the fabrics from the zip and top stitch close to the zip teeth.

Now flip your fabrics so both outer fabrics are facing right sides together on one side of the zip, and both inner fabrics are facing right sides together on the other side of the zip. Match up the raw edges and pin then stitch them together.

Turn your bag so that it is inside out. Lay it flat with the zip in the middle at the top and the centre seam in the middle on the bottom.

With the zip open, pin both short sides together, and stitch across both ends.

Trim off the excess zip and the edge of the seam with pinking shears to help prevent fraying. If you don't have pinking shears you could run a line of zig zag stitching close to the seam and then trim with regular dressmaking scissors.

The Strap
Take your strap piece. Fold the long sides into the centre like this.

Then fold the whole thing in half to hide the raw edges.

It should look like this. Top stitch down both long edges to hold in place.

Box out the corners and add the strap
Pinch one of the corners of your bag and flatten it to a triangle shape.

This is where your strap will be attached, inside this corner!
(This picture shows where the strap will sit, but you need to push it inside as shown in the next picture)

The strap is now inside, pushed right up as far into the corner as it will go.

Stitch across the corner about
2.5 cm (1") from the point of the triangle)


Take the other end of the strap and push it into the other corner near it as you pinch that into a flat triangle too. Make sure the strap isn't twisted!


Stitch across that corner as you did with the other one.
Then pinch, pin and stitch the other two corners in the same way. This makes the nice box shape for your bag.

Cut each corner off using pinking shears again to prevent fraying.

Turn your bag right sides out, and it's done!


This tutorial is also available as a free PDF download here.
So there you have a complete personalised sewing kit bag.
I made each of my girls a personalised needle case and a tomato pincushion to add to their sewing kits. I also added dressmakers scissors, threads, needles, pins, a white marking pencil, a thimble, a tape measure, a quick unpick and some safety pins.


Over the next couple of days I will share how I made the needle books and the tomato pincushions.
This would make an ideal gift for someone - together with

They both look great with the applique, Jill.
ReplyDeleteThanks Pam!
DeleteHi Jill,
ReplyDeleteYou are an amazing sewer. I love everything you make.
Thanks for sharing this at Cooking and Crafting with J & J.
Julie xo
Thanks Julie!
Deleteoh wow...this is so great! :) Lovely idea!
ReplyDeleteThanks for joining Cooking and Crafting with J & J!
Thanks Jessica!
Deletethis is an awesome idea thank you for sharing.
ReplyDeleteThanks Linda!
Delete