

Here are the materials I used

Silver car windscreen shade
An old Chinese style dress from the charity shop
An old curtain swag given to me by a friend
Toggles from an old bag
Straps from some kind of old car seat (I have a bag of useful straps I've saved off broken bags etc over the years)
Black fabric remnant also from the charity shop
Velcro and cord

I wanted to personalise the bags, so if you want to do this, print out initials (or whatever you like) on paper

Then trace upside-down onto Vlisoflex
(also known as Bondaweb in the UK - iron on sticky stuff for applique, if it's not called either of those where you are!)

Iron this onto the wrong side of the pretty fabric

And cut out the letters / your design. This now has a peel off backing with the sticky stuff you can iron onto the fabric.

So here are the cut out fabrics ready to start. You need:
1 piece silver car shade material 45cm x 26cm
1 piece fleece batting material, also 45cm x 26cm
2 pieces pretty fabric 15cm x 26cm
1 piece plain fabric (for base) 18cm x 26cm
2 pieces plain fabric (for flap) 18cm x 20cm
1 piece black fabric for top of bag 52cm x 14cm
1 piece cord 62cm long
1 piece stitch-in hook and loop velcro 6cm long
1 plastic toggle to secure cording
Strap 75cm long
Applique design ready to iron on
OK, now we're ready to start sewing

Place the applique and one side of the velcro on the right sides of your plain flap material. Then iron and stitch on securely.

Zig-zag around the edges of your applique to secure. Although the instructions of the iron on paper often say you don't need to stitch, I find that after time it does peel off if you don't stitch it!

Pin and stitch the 2 flap pieces right sides together, around 3 sides.
.jpg)
Trim the seams and corners

Turn out and top stitch close to edge.
(I topstitch 1/8" from edge, and my seams are all 3/8" here)
Next comes the black fabric used for the drawstring cover under the flap of the bag.

Double turn the long edge over to make the casing for the cord. Pin securely.

Make sure you turn the final edges under when you pin, as these edges will be exposed when the bag is finished.

Stitch casing closed - making sure it's wide enough for your cord to be threaded through it.
Then fold the fabric lengthways, right sides together and pin up to cord casing.

Then stitch along the pin line - but only as far as the cord casing - that needs to be left open to get the cord in at the end!
I also recommend stitching across the top of the seam juut under the casing for a little extra strength on that seam.
.jpg)
Now it's time for the main part of the bag:

Lay your pretty fabric and plain base fabric out like so. (try not to notice how wonky my cutting is!!)
Then pin right sides together and join

Once you've joined all 3 pieces together, then baste along long edges to fleece batting.

Lay your second piece of velcro centrally on the pretty fabric like this (7.5 cm from base fabric): and stitch.

Now you have your inner and outer fabric ready.

Fold both pieces over, right sides together

And stitch along edges to form two separate pockets

Next you need to box out the corners to make the base of the bag flat. Put your hand inside the pocket up to the corner and flatten it like so:

Try to get the seam as central as possible in your little triangle. You may like to draw a line with a ruler on the fabric where you're going to stitch. Here are the measurements I used:

Stitch along this 7cm ruler line. I go over my line of stitching 3 times for extra strength in the bag.
Then cut the corner off.

Repeat with the silver pocket

Your inner and outer bag are almost ready to be joined together!!

First though, the black drawstring part needs to be joined to the silver part. Push it inside this way:

And pin the raw edges together all around, then stitch together.
Once you're done, pull the black part to the outside of the silver and fold the top at the seam. This will make it easier when you join the inner and outer bag together later.
Now you need to pin the flap to the back of the outer bag, right sides together.

And then pin the straps to the sides. Stitch the flap and straps securely in place.

Now you're ready for the final join!!
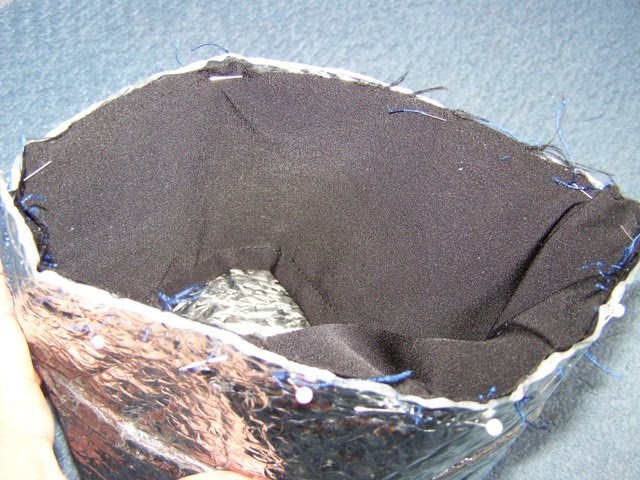
Push the silver inner part inside the pretty outer part.

Now comes what I found to be the trickiest part of all!
Folding the raw edges down inside the bag to get a neat top edge. Then pin securely.

Don't forget to lift the flap, and the black part out of the way when you pin!

Then carefully topstitch around the top of the bag. I'd recommend a large needle in your sewing machine for this, as it has to go through quite a few layers. (I broke my little skinny needle sewing this part!!)

Now all you need to do is push the cord through the drawstring casing in the black fabric, using a safety pin.

Then push the two ends through your toggle and tie securely.

One finished insulated lunch bag! Made from recycled materials!!
This is about what I could fit into one of mine:

Like this:

So now I can pack off two little packed lunches and send my girls off to the secret garden!! I hope they like them!!

Hope you found that tutorial easy enough to follow. Do let me know if you try making one, and send a picture! I'd love to see different versions!


For the PDF version of this tutorial with measurements in both cm and inches- click here
Hi guys,
ReplyDeleteI'm a new follower! I need all the help I can get in the sewing department! I love those insulated bags with the person's initial on it. Great work and thanks for sharing.
Anne-Marie
Following you from TAT please follow back. cute blog!
ReplyDeletehttp://littlebittyspicecakes.blogspot.com/
What wonderful bags! And the tutorial is wonderful! I can follow along with no problems.
ReplyDeleteLove the initial!!
Hugs
SueAnn
Great tutorial! I love the recycled part as well- how very green of you! ;)
ReplyDeleteThis is going to come in perfect as we are about to head into summer and I love biking and picnics. So much easier with individual bags rather than the huge, heavy basket weighing one of us down!
They are absolutely brilliant! Thanks for the tutorial...that must take you ages! We certainly appreciate it. Hope your week is full of happy, giggly times :)
ReplyDeleteThank you all!! They are lovely lightweight bags. My girls loved them when they came home from school, and can't wait to test them out! Weekend picnics are already planned!
ReplyDeleteJill
Awesome idea!!! Love to make some for my kids...
ReplyDeleteWOW! These look great. Love how you done the monogram. Be blessed. Cindy
ReplyDeleteSoooo CUTE and thrifty...thanks for showing us how to make one!
ReplyDeleteBlessings,
Linda
I seriously need this in my life right now.
ReplyDeleteI'd love to have this linked to my weekly link party "Make Your Style Mondays"
www.avidaccents.blogspot.com
love them! I'm visiting with creative itch.
ReplyDeletethanks for linking on Take-A-Look Tuesday! Mandy, www.craftedition.blogspot.com
ReplyDeleteWhat a great tutorial!! And I love that you repurposed items to make them!! Thanks for linking @Creative Itch's "Sew Cute Tuesday"!
ReplyDeleteThat is a fabulous idea and so cute too! Stopping in from TTA. Fabulous ideas...I am a new follower.
ReplyDeleteHolly
www.504main.com
Cute Blog!!! I’m a new follower! Feel free to check out my blog as well! http://heavenlysavings.blogspot.com
ReplyDeleteHappy TTA! Hope to Blog with you again soon!
Hi, Great pictures and instructions... makes me want to dust of my sewing machine. Looking forward to more of your blog... glad I found it through the Tuesday Tag-Along over on Twee Poppets. I’m a new follower and would sincerely appreciate if you’d visit my blog. Follow if you like it: My Tot Travels
ReplyDeleteYou can also find me on Twitter and Facebook
Happy Travels,
Lilli (#100 on the list)
www.MyTotsTravel.com
My Tot Travels...
Learning to Parent on the Road of Life ( great tips for traveling with kids)
Great tutorial and lovely bags!
ReplyDeleteI love all the recycled materials you used. Nice work!
ReplyDeleteI love this!! I was planning to make my kids lunch bags over the summer and I think these would be perfect.
ReplyDeleteThanks for stopping by my blog...
Rachel
SewAmbitious
linking up from tutorial tuesday - great tute and such cute bags.
ReplyDeleteHi There! Stopping in to be your newest follower! Swing by my blog when you have a chance. Have a great week!
ReplyDeleteBridgette Groschen
Groschen Goblins
www.groschengoblins.com
Hey there :)
ReplyDeleteI'm following you from Tuesday Tag Along, I hope you'll stop by and follow me too.
and wow, those turned out great! I couldn't even tell they were handmade at first :O!
http://mylifewithratsandmore.blogspot.com
You Rock gal. These are awesome. I love your site.
ReplyDeletegourdsrmylife(at)yahoo(dot)com
These are too cute! Thanks for the great tutorial!!
ReplyDelete~Morgan
Meet Virginia!
Meet Virginia!
Meet Virginia!
I LOVE the new blog design!! (and the awesome tutorial!)
ReplyDeleteI am going to have to make one of these for my oldest when he goes to nursery school in the fall!
Wndscreen shade - brilliant idea!!
ReplyDeleteGreat tutorial, thank you
ReplyDeleteWow what a great idea!! Thanks for the tutorial!
ReplyDeleteReally cute bags! I SO wish I could sew. LOL I'm a bit late coming over for Creative Share on Trendy Treehouse! :) Thanks for following, and I'm now following you with all 3 of my blogs.
ReplyDeleteVery cute! What fun colors too!
ReplyDeleteThanks for linking up. Hope to see your fabulous DIY again at Make My style Mondays.
ReplyDelete~L~
This is an absolutely FABULOUS tutorial! I am bookmarking it for future reference!
ReplyDeleteThanks so much for stopping by to comment on my bubble wrap crocodiles. I really appreciate it. :)
Amy
ohh wow, that's fabulous, now when my sewing skills improve I need to come back to this.
ReplyDelete♥
Wonderful concept, great tutorial! Personalize them with wonderful novelty prints found at www.jofabrics.com for a truly unique gift! Thanks for the sharing
ReplyDeleteWhat a great idea! I'm going to have to add this to my list of things I want to make (it's getting longer & longer). I love the idea of the monogram on them too. My younger kids would love these! Thanks for sharing!
ReplyDeleteRachelle S.
http://chelstamps.blogspot.com
http://rpsphotography.com
You are - this is - sooo cool. It's such a neat idea. Your directions are clear and simple. Thanks for sharing and thank you for your hard work at showing us "how to". Will be following your site from now on!!
ReplyDeleteHi!
ReplyDeleteWonderful idea! Thanks for this tutorial. I'll make it. I enjoy visiting your blog.
Kisses from Venezuela
Ah-ha!! I have been wondering for a while what to use as the insulation for an insulated bag. Thanks for the tutorial.
ReplyDeletehi... really like this tutorial..can't wait to try it out.. thanks for sharing..
ReplyDeleteI know this is an old post, but I just wanted to say thank you! I made one for my daughter and she loves it. I did a couple things differently. I made a freezer-stenciled logo instead of an applique, I made a short handle on it and I didn't sew the insulated part in so that I could remove it and toss the bag into the washing machine.
ReplyDeleteIt turned out really well! thanks for teaching me.
Do you ever throw anything away, Jill??? I would never think to save old car seat straps. We can all follow your wonderful example. Great recycling!!!
ReplyDeleteVery Nice... Thanks
ReplyDeleteoh a woman after my own heart. I LOVE the recycled supplies! I do that too, especially fabric. I have a belt and strap collection too. ;) Thank you for the tutorial, and I grabbed the round tuit. :)
ReplyDeleteya! it'll ""frozen'" well ...gorjuss carefu bag @challo
ReplyDeleteThank you!
DeleteOh wow! I designed a lunch bag for my daughter using an old windscreen shade, too! I slso made one for hot food using pure wool batting!
ReplyDeleteThat's awesome Karen! Clearly great minds think alike!! :)
DeleteThis is wonderful Jill! Such a useful thing now as the winter approaches and I need to give warm lunches for my A. But difficult to sew without a sewing machine, lol... :)))
ReplyDeleteHa - yep, this one is tricky without a sewing machine! Maybe you could ask a friend to make you one!
Delete