

Last week I set myself a challenge to finally do something with these old car windscreen shades that I've been saving because I was sure they were in some way useful!

First thing I made was a Space Jem!! Here he is:

He is actually a small storage container, which I made mostly furry ones of for a market stall I used to have with a friend.
I found though, that the silver shade material, which has a padded backing was tricky to sew as it wouldn't feed through the machine properly on its own, I had to add a fabric backing to each piece. It also did not stand up well enough to all the tugging and turning that occurs in the making of these Little Jems.
So Space Jem will now join another previous test Jem (see picture below) who I was trying to make into a Ballerina Jem, but she kind of turned into a Sumo Jem instead! and now holds my pins and measuring tapes!

The next thing I decided to make using the silver windscreen material was a set of coasters! Also using some scraps of "Barrier Reef" fish and coral fabric.
Our family has recently purchased an annual pass which allows us to take unlimited day trips out to the Great Barrier Reef, which we are lucky enough to have on our doorstep! My daughters have really taken to snorkelling and all things fishy. This fishy fabric was given to me by another stall holder at our markets, who very kindly passes on her scraps to me.
I've used larger pieces already to make a reef bag for my daughter.
Back to now though....where was I? Oh yes, coasters.
I wanted to make something nice and simple, having learnt how NOT to sew with this silver material! The silver material makes them a nice firm shape, and they're great for use on those outdoor tables that can be a bit dusty at times, as the silver side just wipes clean!
Here's the result:

And since they were so straightforward. I figured they would be a good thing for me to try posting my first ever tutorial about!
Here goes!
First I found a coaster and made a paper pattern from it, by cutting a square the same size for the silver material. I then cut another square from paper about 1 cm larger on each side, for the fabric. (It would be easier to cut an even larger square for the fabric pieces, but my scraps are very small so I was limited by their size! )

I then cut six coaster size pieces of silver material, and six larger squares from the fabric.

To put them together, lay wrong sides together, the smaller silver square as centrally as you can on the larger fabric square.

Now turn each edge of the fabric over double, to hide the raw edge and pin to the silver square like this:

Pin all four sides like this in the middle, leaving the corners for now:

Now to tidy up those corners....
Fold the corner of the fabric under the silver square as shown in the picture below:
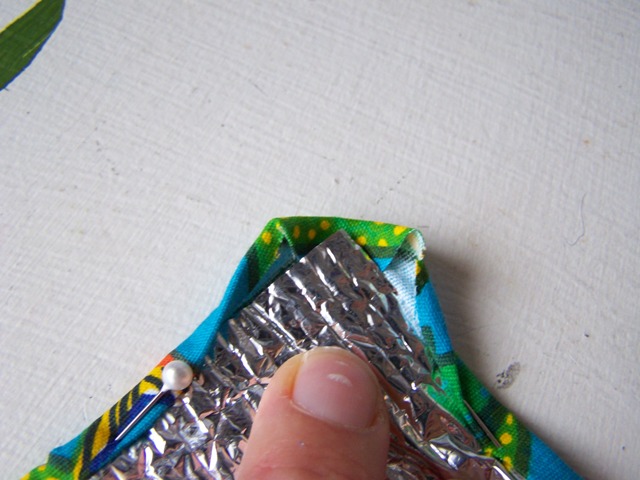
Then fold the sides over, making the edges meet like this:

Pin to secure.
Sew around the 4 edges of the coaster.

That's it!! You're finished!
Here's the finished fabric side:

And the finished silver side

And just to show you, all six that I made! Some fish and some coral. Best of all they're easy to make, fun to use and they only used bits and pieces I have lying around in my sewing room!

I was so pleased with the results of this, that I decided to have a go at a couple of placemats to match for my two daughters.
If you come back tomorrow, I'll post pictures of those, and another tutorial!

Love the spaceman! Great ideas for something otherwise going into the landfill! thanks for the great ideas!
ReplyDeleteCute stuff! I have one of those shade things, too. It's just been lying around, so now I have a use for it.
ReplyDeleteBTW, I love the way you do a mitered corner on the coasters!
They look great. What a fun fabric too. Thanks for sharing with Made it Monday! Jules
ReplyDeleteGreat idea! I love the little holders too, they are so cute!
ReplyDeleteThanks for the lovely comments everyone. I'll be adding the placemats today!
ReplyDeleteJill
What cute little coasters! I could handle this project!
ReplyDelete☺ Celeste
Cute! Thanks for following from TTA! I'm returning the favor!
ReplyDeletehttp://thekingscourt4.blogspot.com/
Cleaver! The shade will protect your table as well.
ReplyDelete