Upcycled Jeans Pocket Organiser


I made this hanging organiser from jeans pockets and waistbands last week. I was inspired by similar organisers I'd seen on pinterest, but one was just a picture and the other was stuck together with hot glue.
I wanted to sew this one and I'm really pleased with how it turned out!

I simply patched together a selection of cut out pockets I had in my stash.

Then I pinned and carefully stitched a couple of cut waistbands around the 4 edges. 

This was the hardest part as the waistband is so thick to stitch through, particularly the corners, where I had to join 2 waistband parts together. On one of the corners I managed to join two waistband pieces using the buttons and buttonholes already there! Perfect.

Finally, I needed to add something to the back of the organiser, to help it hold its shape. 

I chose to use my scraps of buckram (a kind of really thick interfacing).  I stitched these together in strips until I had enough to cover the back. I then stitched this backing to the edge of the waistband, skipping the thick parts and belt loops. I chose just to leave the backing like this as it will just be hanging against the wall and nobody will see that side, so no need to make it look pretty!

To hang it up I simply pushed a small piece of dowel rod through the belt loops at the top and tied a piece of cording to this.

It's a neat organiser to have. Pockets of various sizes for notebooks, pens, rulers and notes. Plus the belt loops are handy for pens too!

It's also a great way to use up those jeans waistbands - and of course the pockets.

For lots more ways to upcycle jeans or other clothes - you can visit my ongoing linky which now has over 600 clothes upcycling ideas.

Please do also check out my clothes upcycling challenge for this year, where I'm upcycling a pile of clothes from last year's school carnival to sell at this year's carnival.  Go here to see what I've made so far.

To keep up with the latest from this blog and all things upcycling and inspirational, I'd love if you followed me on 

Jill

Making maths fun - or how I've stitched some fun into maths for my kids!


Yesterday I made a 'lockable' fabric box to use as an incentive to get my kids to practice maths problems. You can read about that here!

It got me to thinking about other things I've sewn when trying to help them with their maths!

First there were the giant foam dice 
 and a large chalkboard scoring pad I made so we could play Yahtzee outside. Yahtzee is a great game for practising basic maths skills of adding and multiplication.

Battleships is great for practising co-ordinates, and it's a really fun game - and one than can be taken out and about to play in the car, waiting rooms etc. For a free printable battleships sheet go here. I sometimes slip word searches or other puzzles into the folders to so they can play on their own too.

Later on I made a set of Times Tables Memory Pockets.
Each pocket has as set of cards with a different times tables on so you can play the game memory with them, matching '2 x 3' with '6' for example.

We had this hanging on the wall next to our dining room table and often just grabbed a set to play a quick game.
I also wrote a free e-book for learning your times tables in just 5 minutes a day, which is available on my other blog - Be our Best. This book includes the printable templates for the memory game.


So that brings me to what I stitched yesterday to make maths fun for my girls.
A lockable fabric box, with a combination lock. I used scrap fabric and an old plastic place mat to help it keep its shape.

Now I'm going to use it to hold treats in that the girls can only get at if they can solve the maths puzzle correctly!  I can change the combination on the lock each time I set a new puzzle!


All of these things can be done without sewing  - but it's what I love to do, and my girls are always appreciative of things I make. Adding some colour and interest makes some simple boring things just a little more fun!

This is my favourite kind of sewing - something with a use and a purpose. Not necessarily something that we need, but something that we can use!

What's your favourite kind of thing to sew?


Jill

My daughter the designer!


This morning my younger daughter (aged 10) told me she wants to be a designer. After sketching a couple of skirts and hinting that I could make what she designs, I suggested she tried bags or pencil cases (I'd much rather attempt that than sewing clothes!).
So this is what she came up with this morning:


Before she left for school, I got her to choose the fabrics and notions she wanted from my stash.

And then I set to work!

The purple velvet she chose for her name didn't show up as clear as I wanted against the darkish background, so I did my applique stitching around the edges in white to make it stand out more.


She also found a button that she wanted to add to the bow!


I started out with the back of the pencil case.

But I struggled with the shiny green fabric she'd chosen for the pockets. They ended up too small and not exactly straight.

So I looked in my stash for...a pair of green jeans! and used the back pockets from those instead!

In the end - I was quite pleased with how it turned out. I think I followed her design quite well.
Just hope she likes it when she comes home!


This also reminded me of something that Maya designed and made a few years ago:

This is definitely something I need to encourage more of!


I had a lot of fun with this, and hope that both my girls will design more things to make - and make things for themselves too!

Have you ever made things that your kids have designed? Or got them to make things for themselves?


Suggestions and Opinions needed for my latest jeans upcycle

Today I made this:

It's the front of a hanging jeans pocket organiser. I saw one like this on pinterest and have been wanting to try it for myself.
So I used some old cut up jeans:

And played around with the pockets and waistbands..

And amazingly only bent one machine needle while stitching through all those thick seams!

But now I'm not sure how to finish my hanging organiser.

I need to cover the back somehow:

My thoughts at the moment are to either 

1. Cut  piece of buckram (very stiff cloth used for stiffening) to help it hold its' shape. Cover that, then just stitch it to the back of the hanger.

Or 

2. Cover the back with fabric and slide in a sheet of stiff card to help it hold it's shape.

Then I think I'll hang it using a short piece of dowel rod slipped through the belt loops at the top and some ribbon for the hanging loop.

What do you think?

I'd welcome any opinions and suggestions or alternatives!

Jill

Handmade Birthday Gifts from Upcycled Jeans


At the weekend my elder daughter (age 12) had a birthday party to go to, so I had to make a gift for the birthday girl, who likes elephants!

I chose to upcycle a pair of jeans from my stash (because I love upcycling jeans and the fabric is so hard-wearing and versatile).
I paired it with some fun gingham from my fabric stash. I also got my elder daughter to draw an elephant for me to use in the designs.

I scanned and copied the elephant design so that I could print it in varying sizes, and put it onto the fabric using fusible webbing and an iron - with applique stitching.


I made a bag - the same size and shape as one my mum made for my daughter, as it's her favourite just now - the perfect size!

Then I also made a small zipped pouch, that could be a pencil case, or for make up, or anything else that might fit inside!


And finally I added a small notebook folder - like I've just made for my school carnival upcycled clothing stall project!


I'm happy to say the birthday girl loved her gift set..

 and used her bag straight away for a trip to the cinema with her party friends!

I always hand make gifts for my kids friends, so that they get something unique. Plus it's cheaper to make than buy gifts, and handmade is more eco-friendly than something store-bought, which is often plastic, packaged in yet more plastic!

What handmade gifts have you given kids lately? Please do share your ideas and links in the comments below. It's always nice to have more inspiration for the next birthday!

Jill

Inspirational Notebook Folders upcycled from old clothes


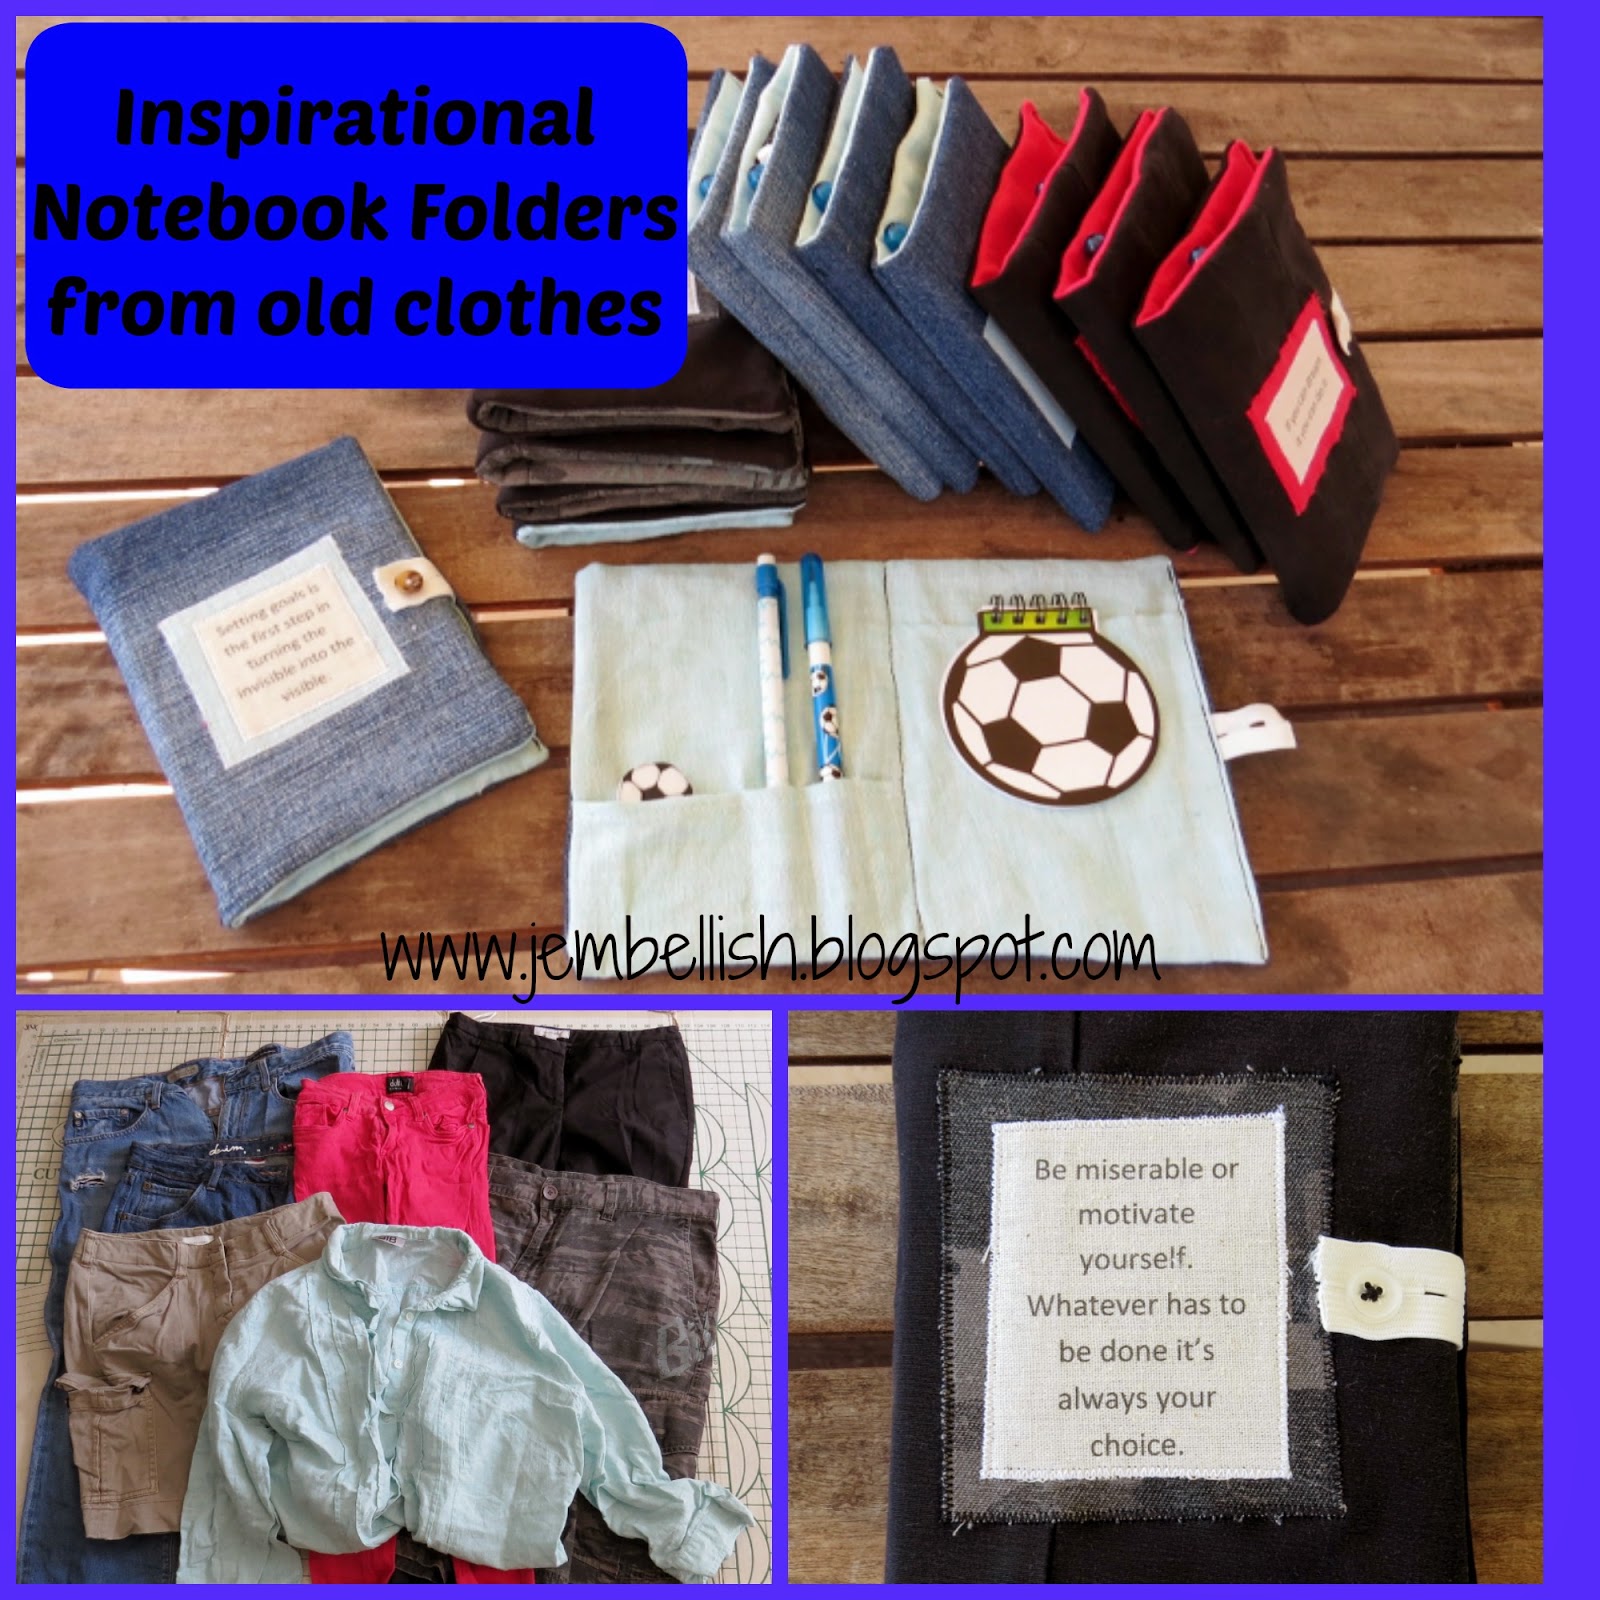
Here's my latest clothes upcycle for this year's challenge to upcycle old clothes into things to sell for my daughters' school carnival.

For this, I decided to try and use up this pile of notebooks and pencils etc that I bought for a few cents last year and they've sat in my stash waiting for months to be used for something useful!


I decided to make a similar folder to one I've made before:

This time I changed the measurements, the pockets on the inside, the embellishment on the outside and the way the folder closes.

Here's the measurements of fabric you would need to make these inspirational folders:

2 pieces stiff cardboard 10 x 15cm (4 x 6”)
1 outer piece fabric (denim) 26 x 17 cm (10.25 x 6.5”)
2 pieces inner fabric (patterned) 17 x 13cm (6.5 x 5”)
1 piece inner fabric (patterned) for pencil pockets 8 x 13cm (3 x 5”)
1 piece inner fabric (patterned) for notebook pocket 15 x 13cm (6 x 5”)
1 piece inner fabric for front quote background
1 piece fusible webbing approx  8 x 8 cm (3 x 3”)

For the fastening
1 button
1 piece elastic - I used the adjustable elastic with ready cut holes reclaimed from the inside waistband of an old pair of jeans! You could also just use regular elastic and snip a hole in it to fit the button through!


For the inspirational quote:
1 piece white fabric, or I used calico - size of A4 piece of paper
1 piece fusible webbing - size of A4 piece of paper


To print the quote onto the fabric - make a template of your quote - or whatever you'd like printed on a simple Word document on your computer. I printed a lot of these quotes at once - if you'd like a copy of my template, click here to download.

Then cut a piece of fusible webbing to the size of an A4 piece of paper. Then iron this to the back of a white piece of fabric - or I used calico. Carefully cut the fabric to the size of the paper and then you have your sheet of fabric ready to print.
Simply put this sheet of A4 fabric into your printer as you would a sheet of paper (making sure the fabric side is up) and hit print!

Once the quotes are printed on the fabric, you can cut each one out, peel off the backing and iron onto the front piece of your folder! I've found through trial and error that black ink works great and survives washing, but coloured ink washes out.  If you iron the printed words once you've finished attaching them, I've read the heat sets the ink into place. I don't know if this is true, but I always do it just in case and my black ink has never washed out!

So for the front of the folder - I ironed a piece of fusible webbing to the back of a scrap of fabric from the inner of the notebook folder. I checked it was slightly bigger than the size of the quote I was going to use. Then I ironed the background and the quote onto the front right half of the denim outer piece of fabric, and applique stitched around both squares.

Then I followed my tutorial to construct the folder - missing out the decorative strip at the back and the flap with velcro for closing it.
I stitched on a button just to the right of the quote and centrally. 
 (the button was reclaimed from the shirt I cut up for the inner fabric).

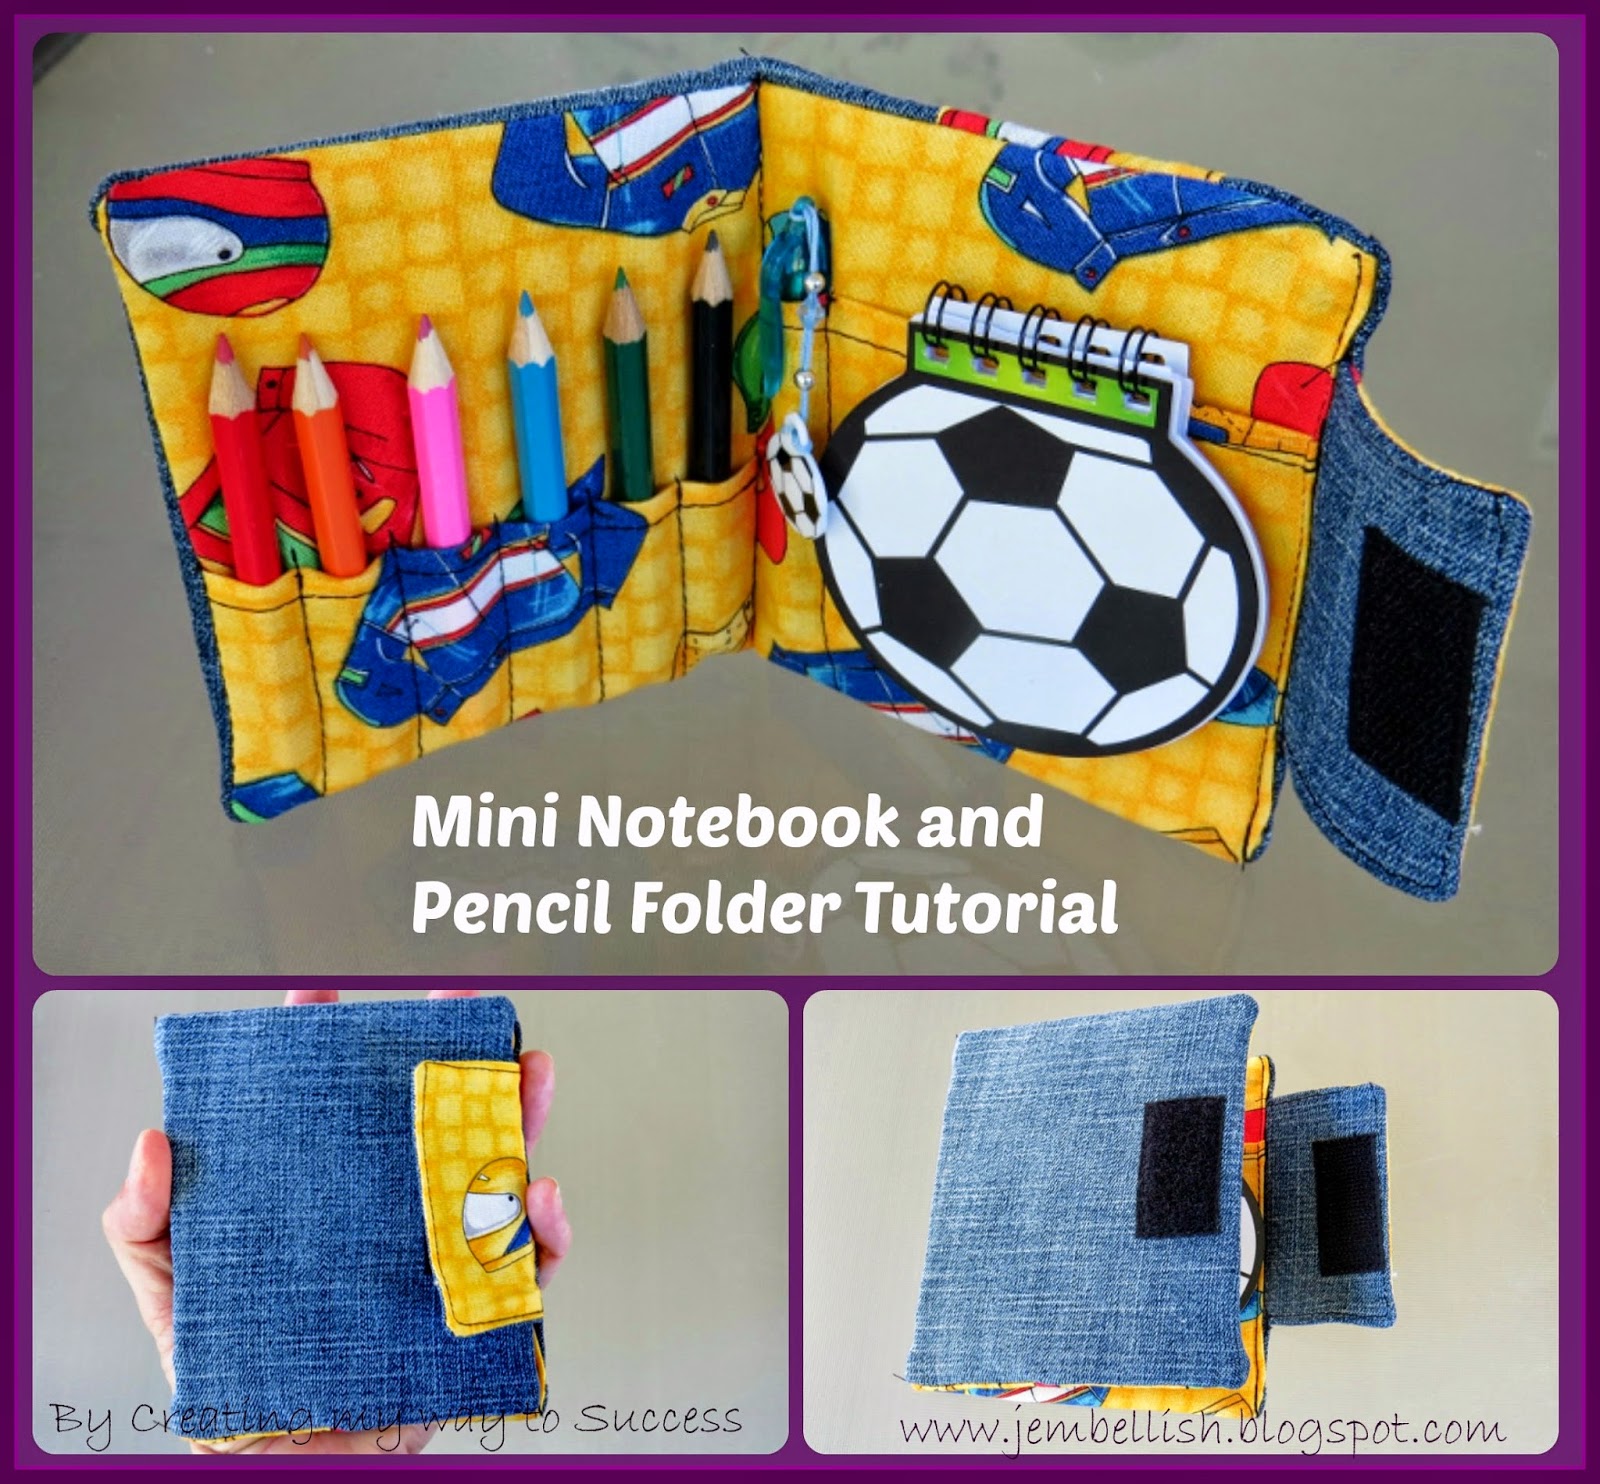
For the pockets on the inside - you can adjust to fit any kind of pens, pencils, erasers and notebooks you have. Just lay them on top of the pockets and pin along where you want to stitch.

I had a pen, pencil and eraser to fit on the left. I also added one extra pencil pocket. On the right I put the notebook in and stitched down either side of it. It's also the right size for other small notebooks you can buy.

The idea is that these folders can be refilled with other pencils and notebooks over time as the others get used up.

For the fastening, I decided to make use of some elastic I'd reclaimed from an old pair of jeans from a previous project. It's the elastic you get in kids pants that you can adjust the waistband size with.

Perfect for closing these notebook folders. I simply stitched the elastic into the folder as I closed the final edge, then closed it by fastening onto the front button and trimmed the edge!


I'm really pleased with these little folders.


And I had fun choosing the quotes to put on them:


This is one of my favourites to tell my girls when they're grumpy about doing something they don't want to do!


From my clothes upcycling stash I used up a pair of blue jeans, a pair of stretchy red jeans, a pale green shirt, a pair of black trousers and a pair of camouflage shorts to make these folders. 
(the second pair of blue jeans and the beige skirt in the picture didn't get touched)

That fabric made 13 folders in all, 

and I still have some scraps left over - together with waistbands, pockets and zips that I'm sure can be used in future projects!

To see the other things I've made so far for the clothes upcycled school stall, go here.

To keep up with more of my clothes upcycling challenge this year and plenty more upcycling ideas and inspiration, I'd love if you followed me on Facebook

Jill