Showing posts with label 5 steps in 15 mins. Show all posts

Make your own Reusable Fabric Bowl Covers in 5 steps and 15 minutes


For a long time now I've been wanting to make myself some of these fabric bowl covers. I remember when I was a child, we used to have a set that we used when we ate outside in summer, to keep the flies off the food.  
Nowadays I have just been using cling film (glad wrap) to cover my bowls - and feel bad every time I do it thinking of the plastic waste I'm creating!


So I finally got around to making myself some, and thought I'd add another new tutorial to show how easily you can make your own Reusable Fabric Bowl Covers.


All you need is some fabric, elastic and paper for a circle template.
I just used simple cotton fabric from my scrap boxes. I can just through them in the washing machine with a regular wash every now and then to keep them clean.  
For the elastic I used pieces reclaimed from the adjustable waistbands of old worn-out kids' pants!
You can make these covers any size you need.


So here is now to make your very own Reusable Fabric Bowl Covers in just 5 steps and 15 minutes!


1. Cutting out
Cut a circle of paper around 5 cm (2") wider than the bowl you want to cover.


 Lay your two fabrics right sides together and pin on your circle template. Cut.


2. Stitch the circles
Stitch the two circles together around the outside, leaving a small gap, then turn right sides out and iron.


3. Making the casing
Cut your elastic just smaller than the diameter of the top of the bowl you want to cover. Then stitch around your circle in from the edge wide enough to allow space to thread your elastic through.


4. Adding the elastic
Using a safety pin, thread your elastic through the casing you just created. Stitch the ends together securely, 


5. Finishing
Finally, top-stitch the opening closed, either by machine or hand.


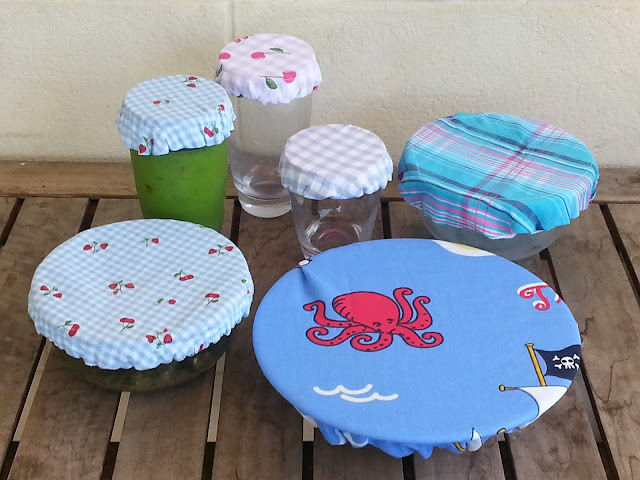
And there you have a finished fabric reusable bowl cover!


You can make them whatever size you choose - to cover bowls, plates and cups.
I made several sizes and used up some of my scrap fabric in the process.


I'm really pleased with how they turned out.
Cute, functional and eco-friendly! What could be better?

For the free downloadable PDF version of this tutorial, click here.

And for more sewing tutorials showing things you can make in just 5 steps and 15 minutes - go here.


Magnetic Pockets a tutorial - 5 steps in 15 mins


Does your fridge look anything like this?

I get endless vouchers and notes that get stuck on the fridge with magnets, but look very messy and cluttered.
So I decided to pretty them up a bit!
So instead of this:

I can have this:

Much neater and prettier!

It's a nice simple project that just uses scraps of material and a magnet for each pocket. (I have several odd magnets that have fallen off things or come unstuck etc).


So here's how to make your own magnetic pocket for the fridge to hold all those coupons, vouchers and notes, in just 

5 steps and 15 minutes

Step 1
Cut your fabric a little wider than you want your pocket and 4 times the length.
(I cut mine 11 x 40cm (4.5 x 16")
Fold in half lengthways with right sides together:

Step 2
Stitch down both long sides:

Step 3
Turn the pocket right sides out and press:

Also press the raw edges of the opening inside the pocket like this:

Step 4
Place the magnet just inside the pocket:

Then stitch across the top of the pocket on both sides of the magnet. I used my zipper foot so that I could get the line of stitching nice and close to stop the magnet slipping around.


Then stitch down the other two sides of the magnet to hold securely in place.

Step 5
Fold up your pocket in half, with the magnet at the top back.

And top-stitch down both sides, close to the edge.

And you're done! Pop it on your fridge and fill up with those vouchers and coupons!


I think my fridge looks a little tidier now, don't you?

You could make these pockets any size you like - but you may need more magnets spaced out across the top for larger pockets!

For the downloadable PDF version of this tutorial, click here.


For more simple sewing tutorials that anyone can sew in just 
5 steps and 15 mins - go here.

And for over 100 free sewing tutorials for all levels and abilities - take a look at 


How to make a simple tote bag in 5 steps and 15 minutes


This last weekend my youngest daughter had another birthday party to go to, so I made the birthday girl one of my 
 (like these:)

I decided to make a bag to give the gift in rather than using wrapping paper.


Here's how to make your own super simple tote bag - in just 5 steps and 15 mins!

You will need:
2 pieces of fabric - one for the inside of the bag and one for the outside, plus a little for the straps.


Step 1: cut your fabric

Fold your outer fabric to the size you want for your bag and cut to size.
 I chose my size by folding the fabric around the notebook folder I wanted to put in the bag, and allowing a little space around it.

Then lay this piece on top of your inner fabric and cut another piece the same size:

And for the straps cut 2 strips 10 cm (4") wide and the length you want the straps to be. You can either measure another bag's straps - or drape a tape measure over your shoulder and measure how long you'd like each strap to be. Mine were 45 cm (17.5") long

Step 2: Stitch the main bag pieces

Fold each main bag piece in half - right sides together and stitch down the sides to form 2 pockets:

Step 3: stitch the straps

Take each strap in turn and iron in half lengthways:

Then open out and fold each half in towards the fold. Iron again:

Finally fold in half again so the raw edges are hidden and iron:

Then top-stitch (stitch close to the edge) down both sides of both straps:

Step 4: Attach the straps to the main bag:

Turn your outer fabric 'pocket' piece right sides out, then pin each strap to one side matching raw edges to raw edge and placing the straps one on either side of the bag like this:

Stitch into place:


Step 5: Stitch inner and outer fabric together

Slide the inner fabric pocket into the outer pocket like this:

Then turn the top edges in towards each other to hide the raw edges and pin the two fabrics together around the top.


Then top-stitch all the way around the top of the bag:

All done!


For the downloadable PDF version of this tutorial, click here.


You can make this bag whatever size you like and use any kind of fabric.
More eco-friendly than wrapping paper - and it's like giving an extra gift!


For more super simple tutorials that anyone can sew in just 5 steps and 15 minutes go here!

Or for over 100 more sewing tutorials for all levels of sewing ability take a look at my tutorials page.


Happy sewing!