This bag came about because I was looking to upcycle a few old sports tank tops that were too stretched to wear but I really liked the words and quotes on the front.
Thinking of sporty things to make, I started with a sports duffel bag with the first top:
Then I decided to make something new with the second one. My eldest daughter has recently started doing yoga and got her own mat for her birthday a few months ago. So a bag to carry her mat it and keep it clean seemed like a good idea!
I just made a simple drawstring bag with a carry handle and add the quote from one of my old tank tops to the main part of the bag.
Here's how you can make your own yoga mat bag!
You will need some fabric, and cord and a toggle for the drawstring.
For the bag cut:
a rectangle of fabric 80 x 52 cm (31.5 x 20.5")
a circle 17 cm (6.75") diameter
( you can download the free circle template here)
for the strap 104 x 14 cm (41 x 5.5")
I also cut the slogan from the front of my old tank top to attach to the bag too.
you also need, cord 66 cm (26'") and a toggle
If you have a logo or picture you want to add to the bag - do this first.
I used fusible webbing to iron my tank top part onto the main bag part and applique stitched around the edge to secure.
To make the strap.
First fold one short end of your strap over and iron.
Then, take your long piece of fabric and iron in half length-ways.
Then open out and fold both edges in towards the crease and iron again.
Then finally fold the whole strap in half and iron again.
All your raw edges will now be enclosed except for one end of the strap.
Top stitch along both sides of your strap.
Your strap is now finished.
To make the bag.
Fold your main rectangle in half length-ways, Pin then stitch the edges together.
To prevent the seams from fraying, as this bag is not lined, finish off the seams using either an overlocker (serger) if you're lucky enough to have one; or just use a zig zag stitch or pinking shears.
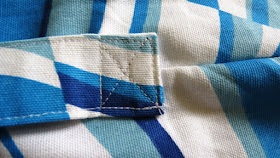
Now turn your bag right sides out and pin then stitch your strap along the seam, with the raw edge in line with the bottom,
And the finished end about 14 cm (5.5") down from the top end of the bag. Secure this end with a square and cross in the middle like this.
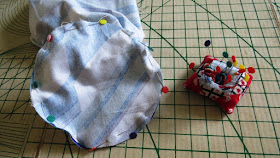
Now turn your bag back inside out and pin, then stitch your circle of fabric to the base of the bag, right sides of the fabric facing.
And once again finish the seam edges off with an overlocker (serger) , zig zag stitch or pinking shears.
Finishing the top of the bag
Using a seam ripper - open up a small gap in your seam about 2.5 cm (1") down from the top. This is to feed your drawstring through. Run a couple of stitches either side of where you have opened the seam to prevent the stitches from unravelling further.
To finish the top opening of your bag, first fold the top edge down about 1 cm (0.5") and stitch.
Then fold the end over again to form the casing for your drawstring. Make sure that the gap you just opened up in your seam is above your line of stitching.
Stitch all the way around.
Now take a large safety pin and use that to thread your drawstring cord though the casing.
Take the two ends of your cord and thread them through your toggle and tie securely. If you like you can use a small scrap of your fabric to enclose your knot. This makes it look prettier and also stops the knot from coming undone!
And that is your yoga mat bag finished!
All ready to go!
2 Tank Tops upcycled..
2 more to go. Do come back to see what I make with those later this week!
If you liked this tutorial, then for over 100 more ideas, take a look at


A+! Love the tip about covering the knot!
ReplyDeleteThanks Mich! I learnt a while ago to always stitch a cover over my knots on drawstring bags. Don't think know tying is my forte!!
DeleteThe perfect fabric for the blue 'Energetic' - looks like they were made to go together.
ReplyDeleteThanks Pam! It is good fabric isn't it? I was so happy it matched so well!
DeleteHi Jill, you are such a talented sewer. I love this yoga mat bag you made. Have fun sewing and creating!!
ReplyDeleteThanks so much for sharing at Cooking and Crafting with J & J.
Enjoy the week.
Julie
Thanks Julie!
DeleteOh this turned out so great!
ReplyDeleteI would love for you to share this with my Facebook Group for recipes, crafts, tips, and tricks: https://www.facebook.com/groups/pluckyrecipescraftstips/
Thanks for joining Cooking and Crafting with J & J!
Thanks Jessica! I'll pop over and share it on your Facebook group now!
DeleteThis is a great idea Jill. Love your yoga bag :) You have reminded me how much I loved yoga, I've not been for years. I must visit a class again ..
ReplyDeleteThanks Claire!
DeleteLove it !
ReplyDeleteThanks Jennifer!
Delete