These bags are easy to make – and perfect for
jewellery with the
small individual pockets inside:
First you need to make your pattern.
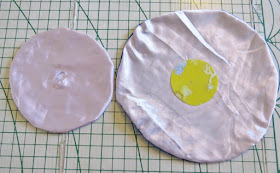
You need three paper circles – one large, one medium and one small. I used a serving dish, a plate from the kitchen and a cup to draw around.
The large circle is approx. 31 cm (12”) in diameter,
The medium circle is 22 cm (8.5”) in diameter,
The smallest circle is 8 cm (3.25") in diameter.
This will make a finished bag around the size
of the palm your hand – but you can make any size you choose!
Cut these three circles out of paper:
Then cut out your fabric.
Outer Fabric
One large circle and two small scrap rectangles.
Inner FabricOne large circle Two medium circles
You will also need some thick plastic – a
washed juice or milk bottle is fine, or I used an old kid's table placemat – for the smallest circle.Ribbon or cord for the
drawstring, 2 x 50 cm (19.5")
Take the outer large circle and fold into
quarters. Place a pin on two edges.
Open the circle out, and place the pins around 3 cm (1.25") in from the edges.
Make a button hole where each pin is, in two opposite edges of the circle. This will be where the drawstring cord or ribbon feeds through when you’re done!
Then place the two large circles, right sides together and pin around the edge.
Stitch all the way around, then snip a hole in the centre of the inner fabric. This is where you will turn the fabric circles right sides out.
Repeat this process for the two inner circles. Pin them right sides together, stitch around the outside, snip a hole in the centre of one circle and turn them right sides out.
Now place the large circle flat with the inner fabric facing up. Place the plastic circle in the centre over the hole you snipped.
then place the smaller circle on top of that, with the hole facing down against the plastic.
Pin around the plastic circle to hold it in place.
Then stitch around the circle, feeling with your fingers as you go to keep your stitching even with the edge. If you use the zipper foot attachment on your machine, it makes it easier to sew close to the circle edge.
Next you need to stitch the pockets. Stitch straight lines from the centre circle
– to the outer edge of the smaller circle. Stitch slightly over the edge to
make it a little stronger.
I didn't measure any of these pockets so they vary a little in size.
Since I chose one light and one dark fabric, I also threaded my machine with one dark and one light thread - light on the top for the pink fabric, and dark on the bottom for the outer blue fabric.
Now you need to stitch the casing for the
drawstring. Stitch two rows of stitching all the way round the outside of the
larger circle – one row on either side of the buttonholes you made earlier.
So now you can thread your ribbon or cord through the casing using a large safety pin.
You will need the two lengths of ribbon or cord.
Thread one all the way round and out one buttonhole.
Tie the two cord ends together.
Then thread the other cord round and out the second button hole – so you end up with something like this.
To finish the edges off, take two small rectangles of the outer fabric (approx. 8 x 4 cm (3.15 x 1.5”)). Fold each rectangle in half, right sides together and stitch down the sides, leaving the end open:
Then turn this mini ‘pocket’ right sides out.
Insert the ends of the ribbon or cord, one into each pocket. Fold the ends in and stitch across the tops to secure in place.
All done!
Ready to fill up with jewellery!
They look great in lots of different colours.
The downloadable PDF version of this tutorial is available here.
If you enjoyed this tutorial, why not take a look at
There are over 100 free sewing tutorials for all levels of sewing ability.
Jill
NB This tutorial is one I made several years ago. This is an updated version.


Gorgeous tute, Jill! Love that your paper circle patterns are kid art!
ReplyDeleteThanks Mich! I get a smile every time I use my patterns like that - it's a great way to preserve their kindy art!
DeleteI made some of these for my bridge group and friends about 25 years ago and they loved them and still use them. The best (and quickest) way to sew a circle for me was to tape a thumb tack on the machine point up, place the center of circle on tack and sew away. The tack is half the width of the circle (ratio?) from the needle. Hope this makes sense.
ReplyDeleteThanks for that tip Linday - I might have to try that. The bags are great aren't they? My mum made me my first one years ago and I had to figure it out for myself. I've since made lots as gifts!
DeleteLooks great and totally practical too, Jill. All the little pockets will prevent jewellery from becoming tangled. A very clever design.
ReplyDeleteThanks Pam. It's one of my favourite little pouches!
DeleteAnother gorgeous creation Jill. I don't know how you fit it all in. You're so inspiring! Thanks so much for linking up to Thriving on Thursdays. Hope to see you this Thursday!
ReplyDeleteAnne @ Domesblissity xx
Anne xx
Thanks Anne!
DeleteLovely project! I have to try it - shouldn't be a problem with your fabulous tutorial. THANKS!
ReplyDeleteThanks Elenor - hope you have fun making one for yourself!
Delete