Pages

My Creative Space - backpack repurposing project 4!

I'm feeling quite proud of myself having found several uses for my pile of old and broken backpacks that has sat in a box in my cupboard for a long time....

I've turned 3 backpacks into:

A bike pack for my daughter:

2 paintbrush organisers:


Padded microphone holders for our karaoke mics!

 Which are now velcroed to the karaoke machine for nice easy and convenient storage!


And here is what I did with all the left over scraps of nice firm backpack material!
Patchworked them together very very roughly...

To create a nicely authentic crumpled witches hat...

Covered with a little ghostly fabric I bought on clearance 2 years ago thinking 'that'll be useful one day'

And wonderfully modelled by  Dorothy...
 Hope my daughter likes it!!  Just got to make a cape for her now (not from a backpack though!! :) )

And now all I've got left is a pile of cut up zips......Not sure if I'll get to these this week though - maybe another time!  At least they don't take up very much space in my fabric stash now!!
What do you have in your cupboard that needs using up??  Go on, have a look!  I've ended up having lots of fun with these old backpacks - and have gained a few useful handmade things, along with some much needed space in my sewing boxes!!


Hope you're all having a lovely day!

Jill


Backpack repurposing continued - project 3!

So the work continues on finding new uses for old broken backpacks!!

So far I've made a bike pack for my daughter.
And a paintbrush roll, and paintbrush bag from two of the backpacks.

Today I finished of project 3 with the third backpack.  This time I used the soft padded part from the back of the pack.  But what did I make?

Well first I have to admit to being a bit of a karaoke lover - so much so that we have our own karaoke machine in our living room:


Earlier this year, my parents bought us some cordless microphones for it (pesky wires kept getting in the way of grooving while we were singing!!
Now these have been stored in their orignial cardboad box on the floor next to the karaoke machine..


Out of the way and safe in their padded box, but not exactly pretty - and I've also been concerned as, living in the tropics, we do have lots of friendly cockroaches who just LOVE to nest in cardboard boxes...

So, my third backpack was cut up and transformed into...


Snug padded cases for our microphones!!

And with the help of some strong sicky velcro.. they can be kept neatly on the side of the karaoke machine itself..


Perfectly neat and ready for action - and another backpack successfully repurposed!!

Now I've just got scraps to use up 
(2 of the backpacks I deemed possible to fix up and use as...well...backpacks!)
Do come back tomorrow to see what my next broken backpack repurpose project is!

Jill


Backpack repurposing project

As you may know, I decided it was time to do something with my pile of broken backpacks that I have been hoarding for several months (some for years!).
Yesterday I showed my first project, when I turned this:

Into this bike pack for my daughter:
For the bike pack, I kept the bottom half of the backpack intact, cut off the top and restitched various pieces and straps to make it fit! And of course added the pretty pink doggie at the front (from an old pair of pyjamas!)
Today I want to show you my second project.
This time I used this backpack - with broken zip..


First I deconstructed the whole thing into parts:


And then reconstructed them into..

.....new holders for my daughter's paintbrushes!
A long pouch for the long brushes..(using an old shoe lace for the tie at the top)

And a roll up pouch for the smaller brushes..

And here they are both together - full of paintbrushes!
(Until now the brushes have all been loose in a box with the paints and other bits and bobs!  I'm trying to tidy that up into a more organised painting container!!) 

What do you think??

Come back tomorrow when I'll show you the next backpack and what I've done with that!


Hope you're all having a great day!


Jill 


SNOW IN CAIRNS!

Today the snow finally arrived in Cairns:


We had a perfect day for it -  blue skies and 30C temps!!


Needless to say the snow wasn't soft and fluffy, but rather hard and icy - and melting fast!!


But the machines kept pumping out more, and lots of fun was had by all!

The prep penguins looked great in their costumes (made by yours truly!)


They gathered in the snow - (tropical penguins in boardshorts!)


For their five minutes of fame on Channel Nine's breakfast Tv show with weatherman Stevie Jacobs


And then time for a little fruit salad for penguin breakfast in the snow...


Voted best fun by all...was the slide!!


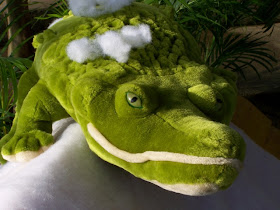
But being Far North Queensland, you still have to watch out for crocodiles! Even in the snow!


Hope you're having a fun day too!


(the tutorial for how to make the penguin suits is here)


Tropical Snow in Cairns - a Penguin suit tutorial


Finally snow day has almost arrived!  Tomorrow (Tuesday) my daughter's school, up here in tropical far north Queensland, Australia,  will be snow blasted with real, cold, white snow!  (the result of a competition win earlier this year)
Everyone is very excited - me included! I mean how often will we ever get snow in Cairns???
It's an early start to the day - up at 5am, and out with our warm clothes, hats, gloves etc - in 30C heat!!  And of course my camera!

As part of this special snow day, which will be televised here in Australia on the Today breakfast show on Channel Nine this morning;  all of the prep students (4 and 5 year olds) are dressing as penguins  and will have a penguin breakfast in the snow.
I was asked to make 36 penguin suits and I'm so looking forward to seeing all those little penguins waddling about in the snow!
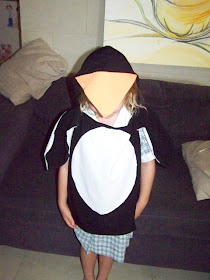
Here's what one looks like (in school uniform!)

The penguins today will be wearing black sleeved tops and tropical shorts underneath - so the overall effect should be better.  And the actual orange beaks are brighter than this one:
Here's the pile of suits - ready to be worn!

For now - here's a tutorial on how to make a penguin suit like this.  When I get home later - I will post photos of the actual penguins having fun in the snow!!

I wanted the suits to be easy for the kids to take on and off and able to be worn over their clothes.  So I decided to make a simple sandwich-board type suit:

First of all, the materials:
Black for the main body and hood:
Main body: 2 pieces - 50cm x 36cm
Hood:  2 pieces - 20cm x 30cm
Wings: 2 pieces - 30cm x 12cm
White for tummy and underwings:
Tummy - 36cm x 28cm
Underwings: 2 pieces - 30cm x 12cm
Orange and stiffening for beak
2 triangles - 24cm base, 14cm high
1 triangle of stiffening, same size


First cut your white tummy piece into an oval as large as possible - I folded the fabric in half so that it was even on both sides.  Then place the white oval on one of the black main body pieces and pin then stitch in place using a zig zag stitch:

Then place the 2 black main body pieces right sides together and join just 3cm across each top corner (the shoulder pieces) Leaving the top open most of the way across for the neck hole.

Then open the 2 pieces out into one large rectangle and neaten all 4 edges with either an overlocker (serger) or for a nicer finish - double turn and stitch.

Next the wings:
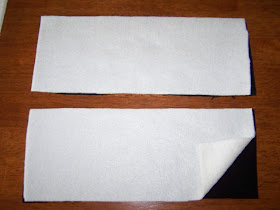
Place the black and white parts of the wings on top of one another like this:


Then fold each double layer in half lengthways, and cut in a curve to form the wingtips:


Open out and pin the white and black pieces together:

Then stitch around the edges, leaving a small opening at the top flat end to turn them out:

When you have stitched both wings, turn them right sides out and pin then stitch to the shoulders of the main body:

Now to the hood:
First the beak. 
Layer the 3 triangles with the stiffening on the bottom and 2 orange pieces on top (right sides together).  Pin and stitch along the two shorter edges of the triangle:

Turn right sounds out and press flat.

Now the hood - I forgot to take a picture of the pieces, but you need to cut the 2 rectangles you have into a hood shape, with the short edge on the bottom, then stitch together:
Here's a drawing :
I joined them using my overlocker - so this finished the edge of nicely too.  If you don't have an overlocker you could do a french seam, or put a row of zig zag stitching close to the seam and trim.

Then you need to pin then stitch the beak to the open hood centrally - right sides together:

Then finish the edges of the hood on either side of the beak by double turning under and stitching.

Next you need to put a row of large stitching across the bottom of the hood itself and pull one end of the stitching to gather the fabric so that it's the same length as the back of the neck hole you've left in the main penguin body.
Then pin it on - right sides together and stitch into place.

You then need to double turn and stitch the front of the neck hole just to neaten the edge.

DONE! 
This fits all the 4/5 year olds at my daughter's school (there are many shapes and sizes of child!)

For the downloadable PDF version of this tutorial, click here.

I didn't take as many detailed photos as I usually do for my tutorials, but hopefully there's enough info here for anyone who wants to try making their own penguin suits!


And for over 100 more free sewing tutorials for making all kinds of things and all levels of sewing ability, take a look at